Taohong的博客


  • Home

  • Archives

掌握Chrome开发工具:新一代前端开发技术

Posted on 2017-08-01 | In 技术

掌握Chrome开发工具:新一代前端开发技术

本文转载自:众成翻译
译者:一只叫做兰胖的食人魔魔法师
链接:http://www.zcfy.cc/article/3722
原文:https://medium.freecodecamp.com/mastering-chrome-developer-tools-next-level-front-end-development-techniques-3ac0b6fe8a3


你可能已经熟悉了Chrome开发工具的基本功能。: DOM检查器、样式面板和JavaScript控制台。
但也有一些不太为人所知的特性可以显著提高你调试或开发应用的速度。

黑色主题

Chrome开发工具的内置了黑色主题。你可以通过点击开发工具窗口右上角的三点图标,之后点击进入设置页面,切换主题。

有时候我觉得黑色主题让我的眼睛更舒服,并且黑色主题显然看起来更酷一些 :)

选择模式

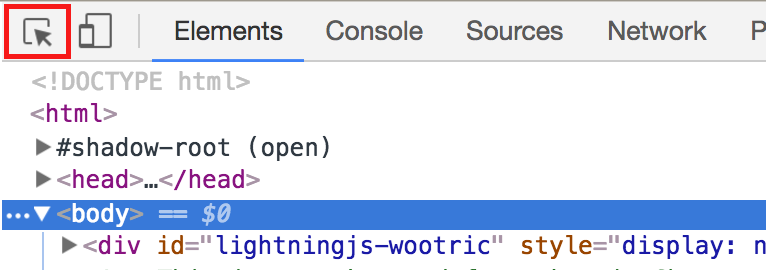
Chrome开发者工具提供了很多选择元素的方法,其中最快捷的方法就是使用选择模式。

该功能通过点击调试面板左上角的按钮开启(或者通过组合键 ctrl + shift + c), 该模式下你只需单击页面上的元素就可以选中它。

一旦开启该模式,你可以将鼠标移动到页面来预览选定内容,然后单击来选择要检查的元素。

通过ctrl + shitf + c键,你可以直接打开调试工具并开启调试模式,来在页面上快速选择一个元素。

存储为全局变量


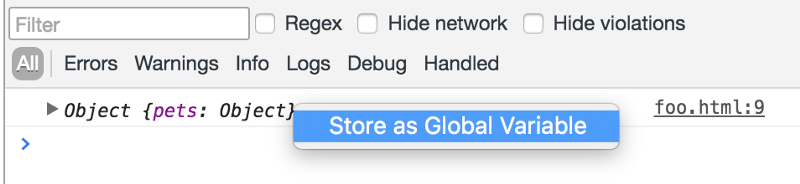
有时在控制台中查看一个复杂对象是一件很麻烦的事,因为他们可能有很多的键值或者一些很难手动解析的值。幸运的是,Chrome可以让检查这类JavaScript对象变得很容易。
你只需在控制台中右键点击对象后选择“存储为全局变量”,chrome就会将这个变量存储为一个名叫“temp1”的变量,之后你可以通过Javascript对其进行操作。

动画工具

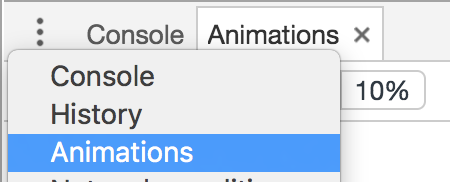
最近,Chrome团队为调试和创建动画添加了一些新特性。

单击控制台左上角的下拉框中的“动画”开启动画调试工具,你可以通过它限制站点上所有动画的速度。

你也可以暂停所有动画。这对于一个充斥着动画内容的站点尤其有用。

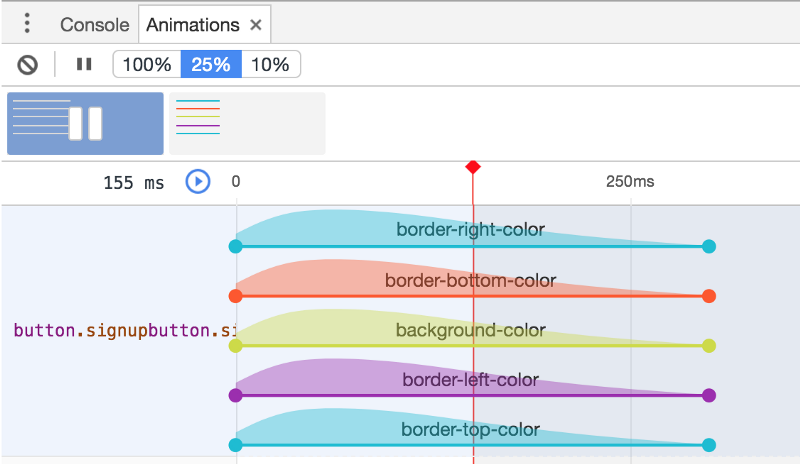
动画查看器允许你单独控制每个属性的时间曲线!

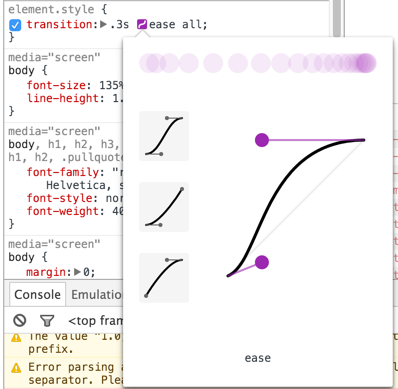
通过点击一个元素 transition 属性中的紫色曲线图表按钮,你可以看到动画的移动曲线,并且微调他的属性。此外,你还可以使用一些预置的时间曲线来应用到你的元素上。
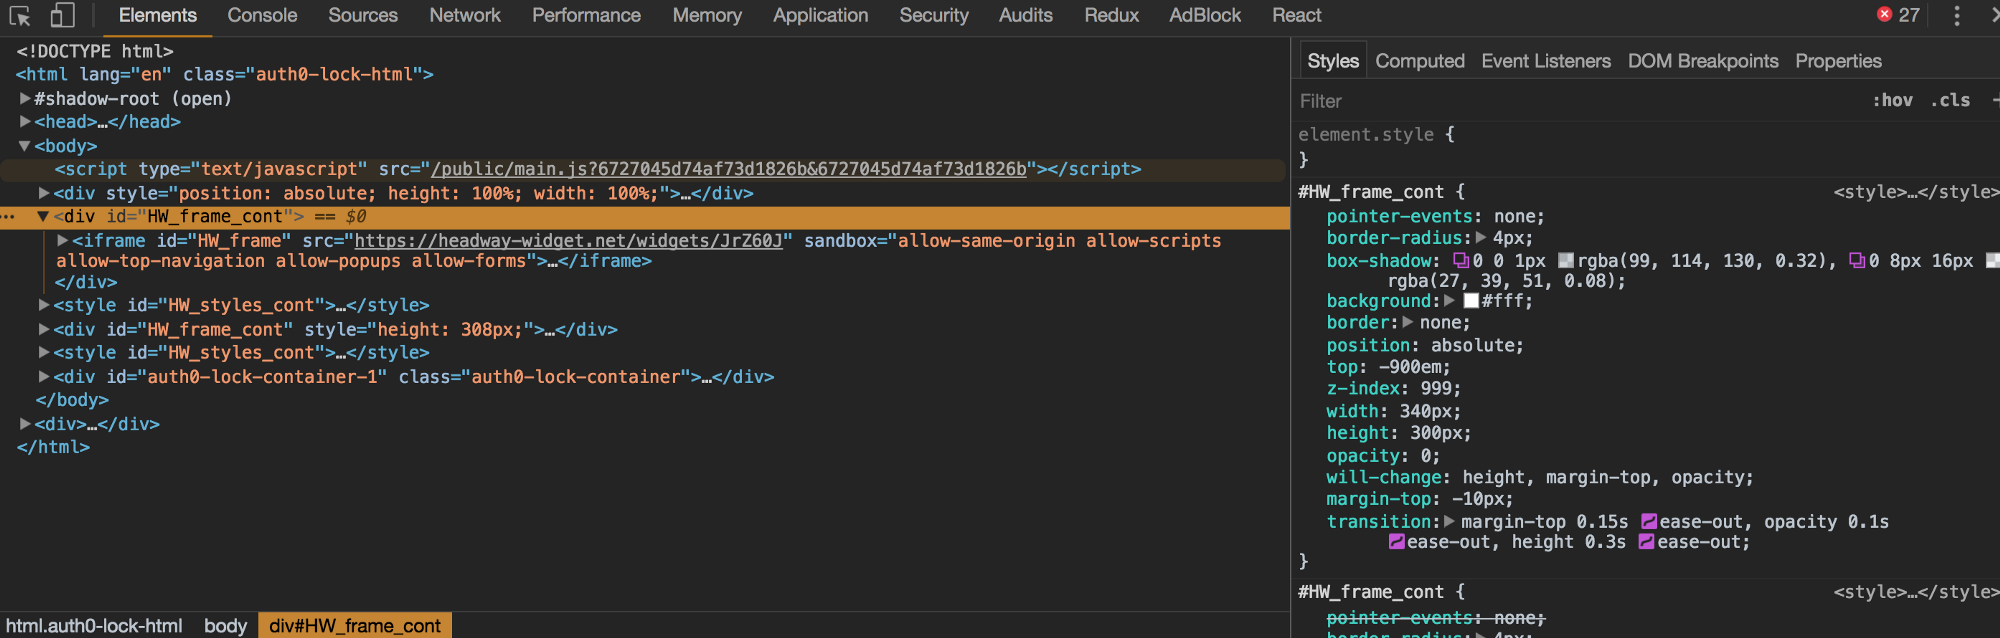
模拟元素伪态

通过点击样式窗口右上角的:hover图标,你可以打开元素状态模拟工具。

该工具可以让你模拟一个元素的hover,active,focused和visited伪态,并且看到不同伪态的相关样式与选择符。

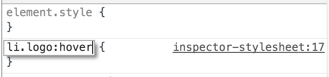
如果要为这些伪态添加样式,可以添加一个新的选择器(使用“+”图标),并将:添加到选择器的结尾。

例如,如果我想要给一个logo类的li标签添加hover伪态样式,我需要构造一个新的伪类li.logo:hover,并且给他添加相关属性。

之后可以通过模拟hover状态来检查你的样式是否正确。

美化CSS和JavaScript


调试、浏览压缩后的JavaScript和CSS是一件非常困难的事情,好在调试工具让这件事情变得容易了一些。

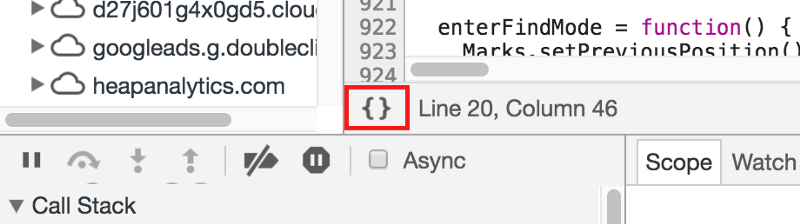
在“Source”的标签栏打开了一个压缩的文档后,你可以点击左下角的花括号logo,之后调试工具就会将代码进行格式化处理。

尽管在压缩过程中丢失了一些信息(例如变量名),该工具对调试CSS和JavaScript文件还是很有用的。

Alt + Up / Alt + Down


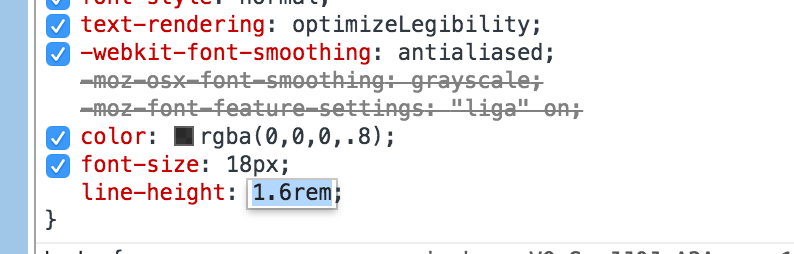
在调试CSS时,你可以选择一个属性然后使用上下箭头来调整它的值。默认情况下,上下箭头会将值加减1。但如果你按住了alt键,再通过上下箭头调整值时候,每次增减的值就会变成0.1,这在处理一些浮点类型的数值属性时非常有用。

相反的,你可以按住shift键一次将数值加减10

保存日志


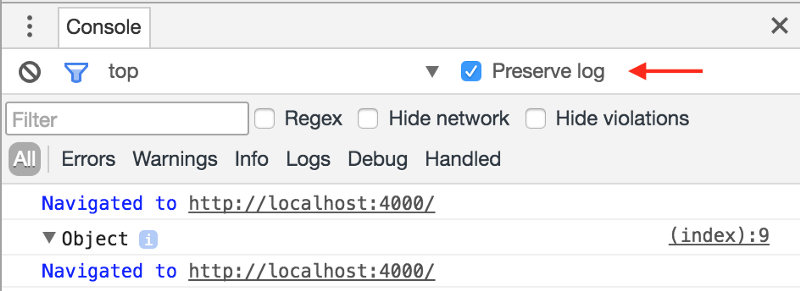
保存日志是一个复选框,它允许在页面刷新后仍然保存日志。这在调试需要刷新页面的网站问题时非常有用,因为默认情况下,所有控制台输出的信息在页面刷新后都会被清除。

启用此选项后,控制台中会出现一个新的“导航”日志,它指向了刷新或是导航到的页面。

网络 + 日志过滤

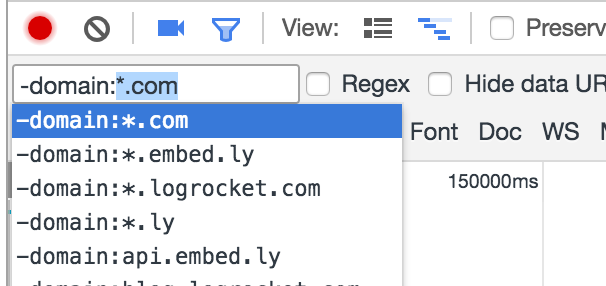
当调试具有大量网络请求或控制台日志的应用程序时,过滤特定类型的事件是很有用的。

Chrome有一种支持多种属性的过滤语言,以及类似于*的通配符。

如果你输入了“-”,Chrome会出现一个包含了可选过滤选项的提示框。你也可以打开“正则模式”来对每一行的数据进行正则匹配。

代码覆盖率


代码覆盖率可以在运行Web应用程序后针对每个JavaScript和CSS文件,查看哪些代码行运行了,哪些代码没有运行。这是很有用的,因为在处理复杂或长期项目时,很容易在项目中累积无用的代码。

如果想要使用这个功能的话,首先升级Chrome到59或更高版本,之后切换到“Coverage”页面。点击“record”,之后开始使用你的Web应用。当你使用结束后,Chrome将向你显示操作期间运行的具体代码。

调试用户遇到的问题

通常来说调试工具只有在你自己的机器上才会生效。但如果你有兴趣了解用户在使用过程中遇到的的bug和性能问题,不妨尝试一下LogRocket。


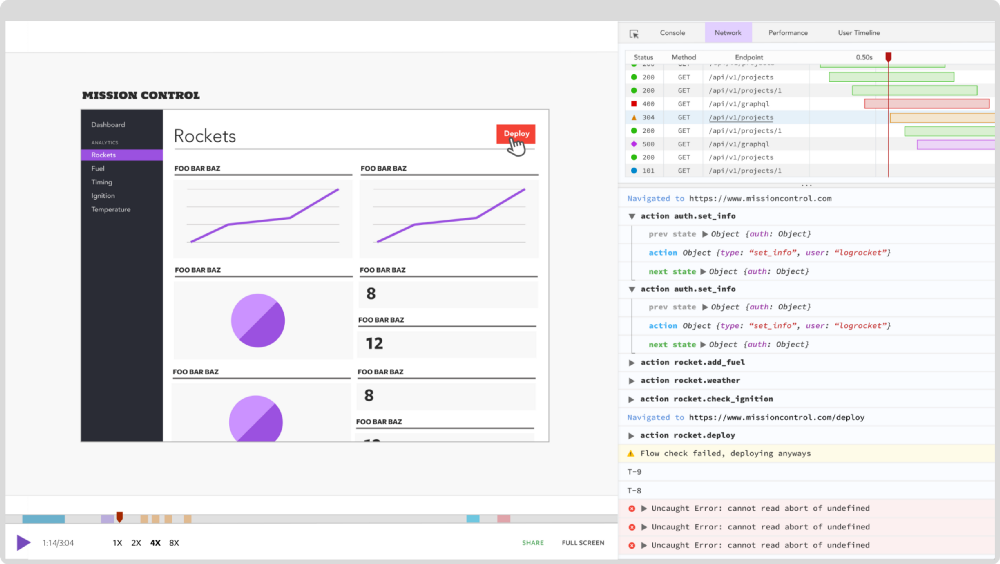
LogRocket
是一个前端日志记录工具,它可以让你重放问题,就像它们发生在你自己的浏览器中一样。 不是通过猜测错误发生的原因,或要求用户提供截图或者错误日志,logrocket可以让你通过重放快速了解到问题出在哪里。它的兼容性很好,无论在任何框架下都可以使用,并且LogRocket对于React、Angular、和Vue的提供了额外的日志插件。


LogRocket
会记录你应用程序中的日志信息、带有header和body的网络请求、浏览器的元数据、Redux的行为与状态、以及应用进行时间与性能。并且他还能记录页面的HTML和CSS样式,完美的还原页面。

点击这里了解 LogRocket 。

LogRocket | JavaScript应用的日志记录和会话回放
_LogRocket帮助你理解那些影响用户的问题, 这样你就可以重新构建更好的的软件。

感谢阅读,希望这些调试工具的小技巧可以帮助你更好地构建应用。

Vue 2.0 高级实战-开发移动端音乐WebApp 课程笔记(第六章 歌手详情页开发)

Posted on 2017-07-31 | In 技术 , 课程笔记

Vue 2.0 高级实战-开发移动端音乐WebApp 课程笔记(第六章 歌手详情页开发)

子路由配置以及转场动画实现

  1. 添加组件singer-detail

    1
    2
    3
    4
    5
    6
    7
    8
    9
    10
    11
    12
    13
    14
    15
    16
    17
    18
    19
    20
    21
    22
    23
    24
    25
    <template>
    <transition name="slide">
    <div class="singer-detail"></div>
    </transition>
    </template>

    <script>
    </script>

    <style scoped lang="stylus" rel="stylesheet/stylus">
    @import "~common/stylus/variable"

    .singer-detail
    position: fixed
    z-index: 100
    top: 0
    left: 0
    right: 0
    bottom: 0
    background: $color-background
    .slide-enter-active, .slide-leave-active
    transition: all 0.3s
    .slide-enter, .slide-leave-to
    transform: translate3d(100%, 0, 0)
    </style>
  2. 路由配置

    1
    2
    3
    4
    5
    6
    7
    8
    9
    10
    {
    path: '/singer',
    component: Singer,
    children: [
    {
    path: ':id',
    component: SingerDetail
    }
    ]
    }
  3. singer.vue添加<view-router>

  4. listview.vue添加点击事件

    1
    2
    3
    selectItem(item) {
    this.$emit('select', item)
    }

基础组件不会有业务逻辑, 仅仅派发事件

  1. singer.vue添加事件
    1
    2
    3
    4
    5
    selectSinger(singer) {
    this.$router.push({
    path: `/singer/${singer.id}`
    })
    },

初识 Vuex

学习一个技术栈时, 首先通过3w方式

  1. vuex是什么
    Vuex 是一个专为 Vue.js 应用程序开发的状态管理模式
  2. vuex解决什么问题
    多个组件的数据共享
    路由间的复杂数据传递
  3. 怎么使用vuex

Vuex 初始化及歌手数据的配置

创建目录

  • store
    • index.js 入口
    • state.js 所有状态
    • mutations.js
    • mutations-type.js mutations相关字符串常量
    • actions.js 异步操作, mutations封装
    • getter.js 获取state映射

为什么要有mutations-type

  1. 书写方便
  2. 方便lint工具检测

  3. index.js

    1
    2
    3
    4
    5
    6
    7
    8
    9
    10
    11
    12
    13
    14
    15
    16
    17
    18
    19
    20
    import Vue from 'vue'
    import Vuex from 'vuex'
    import * as actions from './actions'
    import * as getters from './getters'
    import state from './state'
    import mutations from './mutations'
    import createLogger from 'vuex/dist/logger'

    Vue.use(Vuex)

    const debug = process.env.NODE_ENV !== 'production'

    export default new Vuex.Store({
    actions,
    getters,
    state,
    mutations,
    strict: debug,
    plugins: debug ? [createLogger()] : []
    })
  4. state.js

    1
    2
    3
    4
    5
    const state = {
    singer: {}
    }

    export default state
  5. mutation-types.js

    1
    export const SET_SINGER = 'SET_SINGER'
  6. mutations

    1
    2
    3
    4
    5
    6
    7
    8
    9
    import * as types from './mutation-types'

    const matutaions = {
    [types.SET_SINGER](state, singer) {
    state.singer = singer
    }
    }

    export default matutaions
  7. getters.js

    1
    export const singer = state => state.singer
  8. singer.vue 设置数据

    1
    2
    3
    4
    5
    6
    7
    import {mapMutations} from 'vuex'

    methods: {
    ...mapMutations({
    setSinger: 'SET_SINGER'
    })
    }
  9. singer.vue 设置数据

    1
    2
    3
    4
    5
    6
    7
    import {mapMutations} from 'vuex'

    methods: {
    ...mapMutations({
    setSinger: 'SET_SINGER'
    })
    }

歌手详情数据抓取

  1. api/singer.js 添加方法
    1
    2
    3
    4
    5
    6
    7
    8
    9
    10
    11
    12
    13
    14
    15
    16
    export function getSingerDetail(singerId) {
    const url = 'https://c.y.qq.com/v8/fcg-bin/fcg_v8_singer_track_cp.fcg'

    const data = Object.assign({}, commonParams, {
    hostUin: 0,
    needNewCode: 0,
    platform: 'yqq',
    order: 'listen',
    begin: 0,
    num: 80,
    songstatus: 1,
    singermid: singerId
    })

    return jsonp(url, data, options)
    }

歌手详情数据处理和Song类的封装

创建class Song

1
2
3
4
5
6
7
8
9
10
11
12
export default class Song {
constructor({id, mid, singer, name, album, duration, image, url}) {
this.id = id
this.mid = mid
this.singer = singer
this.name = name
this.album = album
this.duration = duration
this.image = image
this.url = url
}
}

设计成类的好处

  1. 集中一处维护
  2. 面向对象的方式, 扩展性强

添加工厂方法createSong

1
2
3
4
5
6
7
8
9
10
11
12
13
14
15
16
17
18
19
20
21
22
23
export function createSong(musicData) {
return new Song({
id: musicData.songid,
mid: musicData.songmid,
singer: filterSinger(musicData.singer),
name: musicData.songname,
album: musicData.albumname,
duration: musicData.interval,
image: `https://y.gtimg.cn/music/photo_new/T002R300x300M000${musicData.albummid}.jpg?max_age=2592000`,
url: `http://ws.stream.qqmusic.qq.com/${musicData.songid}.m4a?fromtag=46`
})
}

export function filterSinger(singer) {
let ret = []
if (!singer) {
return ''
}
singer.forEach((s) => {
ret.push(s.name)
})
return ret.join('/')
}

music-list 组件开发

  1. 添加业务组件music-list.vue

    1
    2
    3
    4
    5
    6
    7
    8
    9
    10
    11
    12
    13
    14
    15
    16
    17
    18
    19
    20
    21
    22
    23
    24
    25
    26
    27
    28
    29
    30
    31
    32
    33
    34
    35
    36
    37
    38
    39
    40
    41
    42
    43
    44
    45
    46
    47
    48
    49
    50
    51
    52
    53
    54
    55
    56
    57
    58
    59
    60
    61
    62
    63
    64
    65
    66
    67
    68
    69
    70
    71
    72
    73
    74
    75
    76
    77
    78
    79
    80
    81
    82
    83
    84
    85
    86
    87
    88
    89
    90
    91
    92
    93
    94
    95
    96
    97
    98
    99
    100
    101
    102
    103
    104
    105
    106
    107
    108
    109
    110
    111
    112
    113
    114
    115
    116
    117
    118
    119
    120
    121
    122
    123
    124
    125
    126
    127
    128
    129
    130
    131
    <template>
    <div class="music-list">
    <div class="back">
    <i class="icon-back"></i>
    </div>
    <h1 class="title" v-html="title"></h1>
    <div class="bg-image" :style="bgStyle" ref="bgImage">
    <div class="play-wrapper">
    <div ref="playBtn" v-show="songs.length>0" class="play">
    <i class="icon-play"></i>
    <span class="text">随机播放全部</span>
    </div>
    </div>
    <div class="filter" ref="filter"></div>
    </div>
    </div>
    </template>

    <script>

    export default {
    props: {
    bgImage: {
    type: String,
    default: ''
    },
    songs: {
    type: Array,
    default: []
    },
    title: {
    type: String,
    default: ''
    }
    },
    computed: {
    bgStyle() {
    return `background-image:url(${this.bgImage})`
    }
    }
    }
    </script>

    <style scoped lang="stylus" rel="stylesheet/stylus">
    @import "~common/stylus/variable"
    @import "~common/stylus/mixin"
    .music-list
    position: fixed
    z-index: 100
    top: 0
    left: 0
    bottom: 0
    right: 0
    background: $color-background
    .back
    position absolute
    top: 0
    left: 6px
    z-index: 50
    .icon-back
    display: block
    padding: 10px
    font-size: $font-size-large-x
    color: $color-theme
    .title
    position: absolute
    top: 0
    left: 10%
    z-index: 40
    width: 80%
    no-wrap()
    text-align: center
    line-height: 40px
    font-size: $font-size-large
    color: $color-text
    .bg-image
    position: relative
    width: 100%
    height: 0
    padding-top: 70%
    transform-origin: top
    background-size: cover
    .play-wrapper
    position: absolute
    bottom: 20px
    z-index: 50
    width: 100%
    .play
    box-sizing: border-box
    width: 135px
    padding: 7px 0
    margin: 0 auto
    text-align: center
    border: 1px solid $color-theme
    color: $color-theme
    border-radius: 100px
    font-size: 0
    .icon-play
    display: inline-block
    vertical-align: middle
    margin-right: 6px
    font-size: $font-size-medium-x
    .text
    display: inline-block
    vertical-align: middle
    font-size: $font-size-small
    .filter
    position: absolute
    top: 0
    left: 0
    width: 100%
    height: 100%
    background: rgba(7, 17, 27, 0.4)
    .bg-layer
    position: relative
    height: 100%
    background: $color-background
    .list
    position: fixed
    top: 0
    bottom: 0
    width: 100%
    background: $color-background
    .song-list-wrapper
    padding: 20px 30px
    .loading-container
    position: absolute
    width: 100%
    top: 50%
    transform: translateY(-50%)
    </style>
  2. 添加基础组件song-list.vue

    1
    2
    3
    4
    5
    6
    7
    8
    9
    10
    11
    12
    13
    14
    15
    16
    17
    18
    19
    20
    21
    22
    23
    24
    25
    26
    27
    28
    29
    30
    31
    32
    33
    34
    35
    36
    37
    38
    39
    40
    41
    42
    43
    44
    45
    46
    47
    48
    49
    50
    51
    <template>
    <div class="song-list">
    <ul>
    <li class="item" v-for="song in songs">
    <div class="content">
    <h2 class="name">{{song.name}}</h2>
    <p class="desc">{{getDesc(song)}}</p>
    </div>
    </li>
    </ul>
    </div>
    </template>

    <script>
    export default {
    props: {
    songs: {
    type: Array,
    default: []
    }
    },
    methods: {
    getDesc(song) {
    return `${song.singer}·${song.album}`
    }
    }
    }
    </script>

    <style scoped lang="stylus" rel="stylesheet/stylus">
    @import "~common/stylus/variable"
    @import "~common/stylus/mixin"
    .song-list
    .item
    display: flex
    align-items: center
    box-sizing: border-box
    height: 64px
    font-size: $font-size-medium
    .content
    flex: 1
    line-height: 20px
    overflow: hidden
    .name
    no-wrap()
    color: $color-text
    .desc
    no-wrap()
    margin-top: 4px
    color: $color-text-d
    </style>
  3. dom.js 添加 prefixStyle

    1
    2
    3
    4
    5
    6
    7
    8
    9
    10
    11
    12
    13
    14
    15
    16
    17
    18
    19
    20
    21
    22
    23
    24
    25
    26
    27
    28
    29
    30
    31
    32
    33
    // js中的css前缀补全
    let elementStyle = document.createElement('div').style

    // 浏览器能力检测
    let vendor = (() => {
    let transformNames = {
    webkit: 'webkitTransform',
    Moz: 'MozTransform',
    O: 'OTransform',
    ms: 'msTransform',
    standard: 'transform'
    }

    for (let key in transformNames) {
    if (elementStyle[transformNames[key]] !== undefined) {
    return key
    }
    }

    return false
    })()

    export function prefixStyle(style) {
    if (vendor === false) {
    return false
    }

    if (vendor === 'standard') {
    return style
    }

    return vendor + style.charAt(0).toUpperCase() + style.substr(1)
    }
  4. 完善music-list.vue

    1
    2
    3
    4
    5
    6
    7
    8
    9
    10
    11
    12
    13
    14
    15
    16
    17
    18
    19
    20
    21
    22
    23
    24
    25
    26
    27
    28
    29
    30
    31
    32
    33
    34
    35
    36
    37
    38
    39
    40
    41
    42
    43
    44
    45
    46
    47
    48
    49
    50
    51
    52
    53
    54
    55
    56
    57
    58
    59
    60
    61
    62
    63
    64
    65
    66
    67
    68
    69
    70
    71
    72
    73
    74
    75
    76
    77
    78
    79
    80
    81
    82
    83
    84
    85
    86
    87
    88
    89
    90
    91
    92
    93
    94
    95
    96
    97
    98
    99
    100
    101
    102
    103
    104
    105
    106
    107
    108
    109
    110
    111
    112
    113
    114
    115
    116
    117
    118
    119
    120
    121
    122
    123
    124
    125
    126
    127
    128
    129
    130
    131
    132
    133
    134
    135
    136
    137
    138
    139
    140
    141
    142
    143
    144
    145
    146
    147
    148
    149
    150
    151
    152
    153
    154
    155
    156
    157
    158
    159
    160
    161
    162
    163
    164
    165
    166
    167
    168
    169
    170
    171
    172
    173
    174
    175
    176
    177
    178
    179
    180
    181
    182
    183
    184
    185
    186
    187
    188
    189
    190
    191
    192
    193
    194
    195
    196
    197
    198
    199
    200
    201
    202
    203
    204
    205
    206
    207
    208
    209
    210
    <template>
    <div class="music-list">
    <div class="back" @click="back">
    <i class="icon-back"></i>
    </div>
    <h1 class="title" v-html="title"></h1>
    <div class="bg-image" :style="bgStyle" ref="bgImage">
    <div class="play-wrapper">
    <div ref="playBtn" v-show="songs.length>0" class="play">
    <i class="icon-play"></i>
    <span class="text">随机播放全部</span>
    </div>
    </div>
    <div class="filter" ref="filter"></div>
    </div>
    <div class="bg-layer" ref="layer"></div>
    <scroll :data="songs" @scroll="scroll"
    :listen-scroll="listenScroll" :probe-type="probeType" class="list" ref="list">
    <div class="song-list-wrapper">
    <song-list :songs="songs"></song-list>
    </div>
    <div v-show="!songs.length" class="loading-container">
    <loading></loading>
    </div>
    </scroll>
    </div>
    </template>

    <script>
    import Scroll from 'base/scroll/scroll'
    import Loading from 'base/loading/loading'
    import SongList from 'base/song-list/song-list'
    import {prefixStyle} from 'common/js/dom'

    const RESERVED_HEIGHT = 40
    const transform = prefixStyle('transform')
    const backdrop = prefixStyle('backdrop-filter')

    export default {
    props: {
    bgImage: {
    type: String,
    default: ''
    },
    songs: {
    type: Array,
    default: []
    },
    title: {
    type: String,
    default: ''
    }
    },
    data() {
    return {
    scrollY: 0
    }
    },
    computed: {
    bgStyle() {
    return `background-image:url(${this.bgImage})`
    }
    },
    created() {
    this.probeType = 3
    this.listenScroll = true
    },
    mounted() {
    this.imageHeight = this.$refs.bgImage.clientHeight
    this.minTransalteY = -this.imageHeight + RESERVED_HEIGHT
    this.$refs.list.$el.style.top = `${this.imageHeight}px`
    },
    methods: {
    scroll(pos) {
    this.scrollY = pos.y
    },
    back() {
    this.$router.back()
    }
    },
    watch: {
    scrollY(newVal) {
    let translateY = Math.max(this.minTransalteY, newVal)
    let scale = 1
    let zIndex = 0
    let blur = 0
    // 计算图片放大比例
    const percent = Math.abs(newVal / this.imageHeight)
    if (newVal > 0) {
    scale = 1 + percent
    zIndex = 10
    } else {
    // 计算模糊比例
    blur = Math.min(20, percent * 20)
    }

    this.$refs.layer.style[transform] = `translate3d(0,${translateY}px,0)`
    this.$refs.filter.style[backdrop] = `blur(${blur}px)`
    if (newVal < this.minTransalteY) {
    // 向上滑动超过minTransalteY, 改变图片zIndex和高度, 按钮消失
    zIndex = 10
    this.$refs.bgImage.style.paddingTop = 0
    this.$refs.bgImage.style.height = `${RESERVED_HEIGHT}px`
    this.$refs.playBtn.style.display = 'none'
    } else {
    // 反之, 重置
    this.$refs.bgImage.style.paddingTop = '70%'
    this.$refs.bgImage.style.height = 0
    this.$refs.playBtn.style.display = ''
    }
    this.$refs.bgImage.style[transform] = `scale(${scale})`
    this.$refs.bgImage.style.zIndex = zIndex
    }
    },
    components: {
    Scroll,
    Loading,
    SongList
    }
    }
    </script>

    <style scoped lang="stylus" rel="stylesheet/stylus">
    @import "~common/stylus/variable"
    @import "~common/stylus/mixin"
    .music-list
    position: fixed
    z-index: 100
    top: 0
    left: 0
    bottom: 0
    right: 0
    background: $color-background
    .back
    position absolute
    top: 0
    left: 6px
    z-index: 50
    .icon-back
    display: block
    padding: 10px
    font-size: $font-size-large-x
    color: $color-theme
    .title
    position: absolute
    top: 0
    left: 10%
    z-index: 40
    width: 80%
    no-wrap()
    text-align: center
    line-height: 40px
    font-size: $font-size-large
    color: $color-text
    .bg-image
    position: relative
    width: 100%
    height: 0
    padding-top: 70%
    transform-origin: top
    background-size: cover
    .play-wrapper
    position: absolute
    bottom: 20px
    z-index: 50
    width: 100%
    .play
    box-sizing: border-box
    width: 135px
    padding: 7px 0
    margin: 0 auto
    text-align: center
    border: 1px solid $color-theme
    color: $color-theme
    border-radius: 100px
    font-size: 0
    .icon-play
    display: inline-block
    vertical-align: middle
    margin-right: 6px
    font-size: $font-size-medium-x
    .text
    display: inline-block
    vertical-align: middle
    font-size: $font-size-small
    .filter
    position: absolute
    top: 0
    left: 0
    width: 100%
    height: 100%
    background: rgba(7, 17, 27, 0.4)
    .bg-layer
    position: relative
    height: 100%
    background: $color-background
    .list
    position: fixed
    top: 0
    bottom: 0
    width: 100%
    background: $color-background
    .song-list-wrapper
    padding: 20px 30px
    .loading-container
    position: absolute
    width: 100%
    top: 50%
    transform: translateY(-50%)
    </style>

Vue 2.0 高级实战-开发移动端音乐WebApp 课程笔记(第五章 歌手页面开发)

Posted on 2017-07-30 | In 技术 , 课程笔记

Vue 2.0 高级实战-开发移动端音乐WebApp 课程笔记(第五章 歌手页面开发)

歌手数据接口抓取

1
2
3
4
5
6
7
8
9
10
11
12
13
14
15
16
17
18
19
import jsonp from 'common/js/jsonp'
import {commonParams, options} from './config'

export function getSingerList() {
const url = 'https://c.y.qq.com/v8/fcg-bin/v8.fcg'

const data = Object.assign({}, commonParams, {
channel: 'singer',
page: 'list',
key: 'all_all_all',
pagesize: 100,
pagenum: 1,
hostUin: 0,
needNewCode: 0,
platform: 'yqq'
})

return jsonp(url, data, options)
}

歌手数据处理和 Singer 类的封装

1
2
3
4
5
6
7
8
9
10
11
12
13
14
15
16
17
18
19
20
21
22
23
24
25
26
27
28
29
30
31
32
33
34
35
36
37
38
39
40
41
42
43
44
45
46
47
48
49
50
_normalizeSinger(list) {
let map = {
hot: {
title: HOT_NAME,
items: []
}
}

// 填充hot
list.forEach((item, index) => {
if (index < HOT_SINGER_LEN) {
// 封装 类Singer
map.hot.items.push(new Singer({
name: item.Fsinger_name,
id: item.Fsinger_mid
}))
}

// 聚合
const key = item.Findex

// 创建对象
if (!map[key]) {
map[key] = {
title: key,
items: []
}
}
map[key].items.push(new Singer({
name: item.Fsinger_name,
id: item.Fsinger_mid
}))
})

// 为了得到有序列表,我们需要处理 map
let ret = []
let hot = []
for (let key in map) {
let val = map[key]
if (val.title.match(/[a-zA-Z]/)) {
ret.push(val)
} else if (val.title === HOT_NAME) {
hot.push(val)
}
}
ret.sort((a, b) => {
return a.title.charCodeAt(0) - b.title.charCodeAt(0)
})
return hot.concat(ret)
}

新建common/js/singer.js

1
2
3
4
5
6
7
export default class Singer {
constructor({id, name}) {
this.id = id
this.name = name
this.avatar = `https://y.gtimg.cn/music/photo_new/T001R300x300M000${id}.jpg?max_age=2592000`
}
}

listview 基础组件的开发和应用-滚动列表实现

新建通用组件 listview

1
2
3
4
5
6
7
8
9
10
11
12
13
14
15
16
17
18
19
20
21
22
23
24
25
26
27
28
29
30
31
32
33
34
35
36
37
38
39
40
41
42
43
44
45
46
47
48
49
50
51
52
53
54
55
56
57
58
59
60
61
62
63
64
65
66
67
68
69
70
71
72
73
74
75
76
77
78
79
80
81
82
83
84
85
86
87
88
89
90
91
92
93
94
95
96
97
98
99
100
<template>
<scroll :data="data"
class="listview">
<ul>
<li v-for="group in data" class="list-group" ref="listGroup">
<h2 class="list-group-title">{{group.title}}</h2>
<uL>
<li v-for="item in group.items" class="list-group-item">
<img class="avatar" v-lazy="item.avatar">
<span class="name">{{item.name}}</span>
</li>
</uL>
</li>
</ul>
</scroll>
</template>

<script>
import Scroll from 'base/scroll/scroll'

export default {
props: {
data: {
type: Array,
default: []
}
},
components: {
Scroll
}
}

</script>

<style scoped lang="stylus" rel="stylesheet/stylus">
@import "~common/stylus/variable"
.listview
position: relative
width: 100%
height: 100%
overflow: hidden
background: $color-background
.list-group
padding-bottom: 30px
.list-group-title
height: 30px
line-height: 30px
padding-left: 20px
font-size: $font-size-small
color: $color-text-l
background: $color-highlight-background
.list-group-item
display: flex
align-items: center
padding: 20px 0 0 30px
.avatar
width: 50px
height: 50px
border-radius: 50%
.name
margin-left: 20px
color: $color-text-l
font-size: $font-size-medium
.list-shortcut
position: absolute
z-index: 30
right: 0
top: 50%
transform: translateY(-50%)
width: 20px
padding: 20px 0
border-radius: 10px
text-align: center
background: $color-background-d
font-family: Helvetica
.item
padding: 3px
line-height: 1
color: $color-text-l
font-size: $font-size-small
&.current
color: $color-theme
.list-fixed
position: absolute
top: 0
left: 0
width: 100%
.fixed-title
height: 30px
line-height: 30px
padding-left: 20px
font-size: $font-size-small
color: $color-text-l
background: $color-highlight-background
.loading-container
position: absolute
width: 100%
top: 50%
transform: translateY(-50%)
</style>

listview 基础组件的开发和应用-右侧快速入口实现

  1. dom.js 添加通用方法

    1
    2
    3
    4
    5
    6
    7
    8
    export function getData(el, name, val) {
    const prefix = 'data-'
    name = prefix + name
    if (val) {
    return el.setAttribute(name, val)
    }
    return el.getAttribute(name)
    }
  2. scroll.vue 添加方法

    1
    2
    3
    4
    5
    6
    7
    scrollTo() {
    this.scroll && this.scroll.scrollTo.apply(this.scroll, arguments)
    },
    scrollToElement() {
    // 用apply保证调用方法时上下文相同
    this.scroll && this.scroll.scrollToElement.apply(this.scroll, arguments)
    }
  3. viewlist.vue添加dom

    1
    2
    3
    4
    5
    6
    7
    8
    9
    <div class="list-shortcut"
    @touchstart.stop.prevent="onShortcutTouchStart"
    @touchmove.stop.prevent="onShortcutTouchMove"
    @touchend.stop>
    <ul>
    <li v-for="(item, index) in shortcutList" :data-index="index" class="item">{{item}}
    </li>
    </ul>
    </div>
  4. viewlist.vue添加方法

    1
    2
    3
    4
    5
    6
    7
    8
    9
    10
    11
    12
    13
    14
    15
    16
    17
    18
    19
    onShortcutTouchStart(e) {
    let anchorIndex = getData(e.target, 'index')
    let firstTouch = e.touches[0]
    this.touch.y1 = firstTouch.pageY
    this.touch.anchorIndex = anchorIndex
    this.$refs.listview.scrollToElement(this.$refs.listGroup[anchorIndex], 0)
    this._scrollTo(anchorIndex)
    },
    onShortcutTouchMove(e) {
    let firstTouch = e.touches[0]
    this.touch.y2 = firstTouch.pageY
    let delta = (this.touch.y2 - this.touch.y1) / ANCHOR_HEIGHT | 0
    let anchorIndex = parseInt(this.touch.anchorIndex) + delta

    this._scrollTo(anchorIndex)
    },
    _scrollTo(index) {
    this.$refs.listview.scrollToElement(this.$refs.listGroup[index], 0)
    }
  5. 计算所有group的高度

    1
    2
    3
    4
    5
    6
    7
    8
    9
    10
    11
    _calculateHeight() {
    this.listHeight = []
    const list = this.$refs.listGroup
    let height = 0
    this.listHeight.push(height)
    for (let i = 0; i < list.length; i++) {
    let item = list[i]
    height += item.clientHeight
    this.listHeight.push(height)
    }
    }

6 添加watch 计算 currentIndex

1
2
3
4
5
6
7
8
9
10
11
12
13
14
15
16
17
18
19
20
21
22
23
24
25
26
27
28
watch: {
data() {
setTimeout(() => {
// 数据变化到dom的变化有一个延时
this._calculateHeight()
}, 20)
},
scrollY(newY) {
const listHeight = this.listHeight
// 当滚动到顶部,newY>0
if (newY > 0) {
this.currentIndex = 0
return
}
// 在中间部分滚动
for (let i = 0; i < listHeight.length - 1; i++) {
let height1 = listHeight[i]
let height2 = listHeight[i + 1]
if (-newY >= height1 && -newY < height2) {
this.currentIndex = i
this.diff = height2 + newY
return
}
}
// 当滚动到底部,且-newY大于最后一个元素的上限
this.currentIndex = listHeight.length - 2
}
}

总结:联动思路

  1. 知道实时滚动位置
  2. 根据滚动位置计算落在哪个group区间
  3. 根据区间计算索引哪个高亮

listview 基础组件的开发和应用-滚动固定标题实现

  1. 添加dom

    1
    2
    3
    <div class="list-fixed" ref="fixed" v-show="fixedTitle">
    <div class="fixed-title">{{fixedTitle}} </div>
    </div>
  2. 添加计算属性

    1
    2
    3
    4
    5
    6
    fixedTitle() {
    if (this.scrollY > 0) {
    return ''
    }
    return this.data[this.currentIndex] ? this.data[this.currentIndex].title : ''
    }
  3. 添加watch

    1
    2
    3
    4
    5
    6
    7
    8
    9
    diff(newVal) {
    let fixedTop = (newVal > 0 && newVal < TITLE_HEIGHT) ? newVal - TITLE_HEIGHT : 0
    // 减少dom操作的频度
    if (this.fixedTop === fixedTop) {
    return
    }
    this.fixedTop = fixedTop
    this.$refs.fixed.style.transform = `translate3d(0,${fixedTop}px,0)`
    }

Vue 2.0 高级实战-开发移动端音乐WebApp 课程笔记(第四章 推荐页面开发)

Posted on 2017-07-26 | In 技术 , 课程笔记

Vue 2.0 高级实战-开发移动端音乐WebApp 课程笔记(第四章 推荐页面开发)

jsonp原理介绍+Promise封装

jsonp

jsonp github库

Promise封装

1
2
3
4
5
6
7
8
9
10
11
12
13
14
15
16
17
18
19
20
21
22
23
24
import originJsonp from 'jsonp'

export default function jsonp(url, data, option) {
url += (url.indexOf('?') < 0 ? '?' : '&') + param(data)

return new Promise((resolve, reject) => {
originJsonp(url, option, (err, data) => {
if (!err) {
resolve(data)
} else {
reject(err)
}
})
})
}

export function param(data) {
let url = ''
for (var k in data) {
let value = data[k] !== undefined ? data[k] : ''
url += '&' + k + '=' + encodeURIComponent(value)
}
return url ? url.substring(1) : ''
}

jsonp的应用+轮播图数据抓取

  1. 添加请求通用配置文件src/api/config.js

    1
    2
    3
    4
    5
    6
    7
    8
    9
    10
    11
    12
    13
    export const commonParams = {
    g_tk: 5381,
    inCharset: 'utf-8',
    outCharset: 'utf-8',
    notice: 0,
    format: 'jsonp'
    }

    export const options = {
    param: 'jsonpCallback'
    }

    export const ERR_OK = 0
  2. 添加接口文件src/api/recommend.js

    1
    2
    3
    4
    5
    6
    7
    8
    9
    10
    11
    12
    13
    14
    import jsonp from 'common/js/jsonp'
    import {commonParams, options} from './config'

    export function getRecommend() {
    const url = 'https://c.y.qq.com/musichall/fcgi-bin/fcg_yqqhomepagerecommend.fcg'

    const data = Object.assign({}, commonParams, {
    platform: 'h5',
    uin: 0,
    needNewCode: 1
    })

    return jsonp(url, data, options)
    }
  3. 创建 components/recommend/recommend.vue组件

    1
    2
    3
    4
    5
    6
    7
    8
    9
    10
    11
    12
    13
    14
    15
    16
    17
    18
    19
    20
    21
    22
    23
    24
    25
    26
    27
    28
    29
    30
    31
    32
    33
    34
    35
    36
    37
    38
    39
    40
    41
    42
    43
    44
    45
    46
    47
    48
    49
    50
    51
    52
    53
    54
    55
    56
    57
    58
    59
    60
    61
    62
    63
    64
    65
    66
    67
    68
    69
    70
    71
    72
    73
    74
    75
    76
    77
    78
    79
    <template>
    <div class="recommend" ref="recommend">
    </div>
    </template>

    <script>
    import {getRecommend} from 'api/recommend'
    import {ERR_OK} from 'api/config'

    export default {
    data() {
    return {
    recommends: []
    }
    },
    created() {
    this._getRecommend()
    },
    methods: {
    _getRecommend() {
    getRecommend().then((res) => {
    if (res.code === ERR_OK) {
    this.recommends = res.data.slider
    }
    })
    }
    }
    }
    </script>

    <style scoped lang="stylus" rel="stylesheet/stylus">
    @import "~common/stylus/variable"
    .recommend
    position: fixed
    width: 100%
    top: 88px
    bottom: 0
    .recommend-content
    height: 100%
    overflow: hidden
    .slider-wrapper
    position: relative
    width: 100%
    overflow: hidden
    .recommend-list
    .list-title
    height: 65px
    line-height: 65px
    text-align: center
    font-size: $font-size-medium
    color: $color-theme
    .item
    display: flex
    box-sizing: border-box
    align-items: center
    padding: 0 20px 20px 20px
    .icon
    flex: 0 0 60px
    width: 60px
    padding-right: 20px
    .text
    display: flex
    flex-direction: column
    justify-content: center
    flex: 1
    line-height: 20px
    overflow: hidden
    font-size: $font-size-medium
    .name
    margin-bottom: 10px
    color: $color-text
    .desc
    color: $color-text-d
    .loading-container
    position: absolute
    width: 100%
    top: 50%
    transform: translateY(-50%)
    </style>

轮播图组件实现

  1. 创建基础组件 base/slider/slider.vue
    1
    2
    3
    4
    5
    6
    7
    8
    9
    10
    11
    12
    13
    14
    15
    16
    17
    18
    19
    20
    21
    22
    23
    24
    25
    26
    27
    28
    29
    30
    31
    32
    33
    34
    35
    36
    37
    38
    39
    40
    41
    42
    43
    44
    45
    46
    47
    48
    49
    50
    51
    52
    53
    54
    55
    <template>
    <div class="slider" ref="slider">
    <div class="slider-group" ref="sliderGroup">
    <slot>
    </slot>
    </div>
    <div class="dots">
    <span class="dot" :class="{active: currentPageIndex === index }" v-for="(item, index) in dots"></span>
    </div>
    </div>
    </template>

    <script>
    </script>

    <style scoped lang="stylus" rel="stylesheet/stylus">
    @import "~common/stylus/variable"
    .slider
    min-height: 1px
    .slider-group
    position: relative
    overflow: hidden
    white-space: nowrap
    .slider-item
    float: left
    box-sizing: border-box
    overflow: hidden
    text-align: center
    a
    display: block
    width: 100%
    overflow: hidden
    text-decoration: none
    img
    display: block
    width: 100%
    .dots
    position: absolute
    right: 0
    left: 0
    bottom: 12px
    text-align: center
    font-size: 0
    .dot
    display: inline-block
    margin: 0 4px
    width: 8px
    height: 8px
    border-radius: 50%
    background: $color-text-l
    &.active
    width: 20px
    border-radius: 5px
    background: $color-text-ll
    </style>
  1. 添加设置
    1
    2
    3
    4
    5
    6
    7
    8
    9
    10
    11
    12
    13
    14
    15
    16
    17
    18
    19
    20
    export default {
    name: 'slider',
    props: {
    // 循环轮播
    loop: {
    type: Boolean,
    default: true
    },
    // 自动录播
    autoPlay: {
    type: Boolean,
    default: true
    },
    // 轮播间隔
    interval: {
    type: Number,
    default: 4000
    }
    }
    }
  1. 引入better-scroll并设置

    1
    2
    3
    4
    5
    6
    7
    8
    9
    10
    11
    12
    13
    14
    15
    16
    17
    18
    // 设置sliderGroup宽度
    _setSliderWidth(isResize) {
    this.children = this.$refs.sliderGroup.children

    let width = 0
    let sliderWidth = this.$refs.slider.clientWidth
    for (let i = 0; i < this.children.length; i++) {
    let child = this.children[i]
    addClass(child, 'slider-item')

    child.style.width = sliderWidth + 'px'
    width += sliderWidth
    }
    if (this.loop && !isResize) {
    width += 2 * sliderWidth
    }
    this.$refs.sliderGroup.style.width = width + 'px'
    }
  2. 添加common/js/dom.js

    1
    2
    3
    4
    5
    6
    7
    8
    9
    10
    11
    12
    13
    14
    export function hasClass(el, className) {
    let reg = new RegExp('(^|\\s)' + className + '(\\s|$)')
    return reg.test(el.className)
    }

    export function addClass(el, className) {
    if (hasClass(el, className)) {
    return
    }

    let newClass = el.className.split(' ')
    newClass.push(className)
    el.className = newClass.join(' ')
    }
  3. 在mounted中添加方法

    1
    2
    3
    4
    5
    6
    7
    // 一般网页刷新为17毫秒
    setTimeout(() => {
    this._setSliderWidth()
    if (this.autoPlay) {
    this._play()
    }
    }, 20)
  4. 在recommend.vue中使用组件

    1
    2
    3
    4
    5
    6
    7
    8
    9
    10
    // v-if确保slider中有元素后再执行
    <div v-if="recommends.length" class="slider-wrapper" ref="sliderWrapper">
    <slider>
    <div v-for="item in recommends">
    <a :href="item.linkUrl">
    <img class="needsclick" @load="loadImage" :src="item.picUrl">
    </a>
    </div>
    </slider>
    </div>
  5. 在slider.vue中初始化slider

    1
    2
    3
    4
    5
    6
    7
    8
    9
    10
    11
    _initSlider() {
    this.slider = new BScroll(this.$refs.slider, {
    scrollX: true,
    scrollY: false,
    momentum: false,
    snap: true,
    snapLoop: this.loop,
    snapThreshold: 0.3,
    snapSpeed: 400
    })
    }
  6. 初始化dots

    1
    2
    3
    4
    5
    6
    7
    8
    9
    10
    11
    12
    13
    14
    15
    16
    17
    // 添加methods
    _initDots() {
    this.dots = new Array(this.children.length)
    }

    // 在_initSlider中添加监听事件
    this.slider.on('scrollEnd', () => {
    let pageIndex = this.slider.getCurrentPage().pageX
    if (this.loop) {
    pageIndex -= 1
    }
    this.currentPageIndex = pageIndex

    if (this.autoPlay) {
    this._play()
    }
    })
  7. 添加自动播放事件

    1
    2
    3
    4
    5
    6
    7
    8
    9
    10
    11
    12
    13
    14
    15
    // 添加methods
    _initDots() {
    this.dots = new Array(this.children.length)
    }

    // 在_initSlider中添加监听事件
    _play() {
    let pageIndex = this.currentPageIndex + 1
    if (this.loop) {
    pageIndex += 1
    }
    this.timer = setTimeout(() => {
    this.slider.goToPage(pageIndex, 0, 400)
    }, this.interval)
    }
  8. 修改_initSlider

    1
    2
    3
    4
    5
    6
    7
    8
    9
    10
    11
    12
    13
    14
    15
    16
    17
    18
    19
    20
    21
    22
    23
    24
    25
    26
    27
    28
    29
    30
    _initSlider() {
    this.slider = new BScroll(this.$refs.slider, {
    scrollX: true,
    scrollY: false,
    momentum: false,
    snap: true,
    snapLoop: this.loop,
    snapThreshold: 0.3,
    snapSpeed: 400,
    click: true
    })

    this.slider.on('scrollEnd', () => {
    let pageIndex = this.slider.getCurrentPage().pageX
    if (this.loop) {
    pageIndex -= 1
    }
    this.currentPageIndex = pageIndex
    // 添加自动播放
    if (this.autoPlay) {
    this._play()
    }
    })
    // 手动滑动后清除定时器
    this.slider.on('beforeScrollStart', () => {
    if (this.autoPlay) {
    clearTimeout(this.timer)
    }
    })
    }
  9. 添加窗口改变监听事件

    1
    2
    3
    4
    5
    6
    7
    window.addEventListener('resize', () => {
    if (!this.slider) {
    return
    }
    this._setSliderWidth(true)
    this.slider.refresh()
    })

歌单数据接口, axios 介绍和后端接口代理

  1. 在dev-server

    1
    2
    3
    4
    5
    6
    7
    8
    9
    10
    11
    12
    13
    14
    15
    16
    17
    18
    var apiRoutes = express.Router()

    apiRoutes.get('/getDiscList', function (req, res) {
    var url = 'https://c.y.qq.com/splcloud/fcgi-bin/fcg_get_diss_by_tag.fcg'
    axios.get(url, {
    headers: {
    referer: 'https://c.y.qq.com/',
    host: 'c.y.qq.com'
    },
    params: req.query
    }).then((response) => {
    res.json(response.data)
    }).catch((e) => {
    console.log(e)
    })
    })

    app.use('/api', apiRoutes)
  2. 在src/api/recommend.js中添加接口getDiscList

    1
    2
    3
    4
    5
    6
    7
    8
    9
    10
    11
    12
    13
    14
    15
    16
    17
    18
    19
    20
    21
    export function getDiscList() {
    const url = '/api/getDiscList'

    const data = Object.assign({}, commonParams, {
    platform: 'yqq',
    hostUin: 0,
    sin: 0,
    ein: 29,
    sortId: 5,
    needNewCode: 0,
    categoryId: 10000000,
    rnd: Math.random(),
    format: 'json'
    })

    return axios.get(url, {
    params: data
    }).then((res) => {
    return Promise.resolve(res.data)
    })
    }
  3. 在recommend.vue中添加列表

    1
    2
    3
    4
    5
    6
    7
    8
    9
    10
    11
    12
    13
    14
    15
    <div class="recommend-list">
    <h1 class="list-title">热门歌单推荐</h1>
    <ul>
    <li v-for="item in discList" class="item">
    <div class="icon">
    <img width="60" height="60" :src="item.imgurl">
    </div>
    <div class="text">
    // v-html:转义
    <h2 class="name" v-html="item.creator.name"></h2>
    <p class="desc" v-html="item.dissname"></p>
    </div>
    </li>
    </ul>
    </div>

scroll 组件的抽象和应用

  1. 添加通用组件scroll

    1
    2
    3
    4
    5
    6
    7
    8
    9
    10
    11
    12
    13
    14
    15
    16
    17
    18
    19
    20
    21
    22
    23
    24
    25
    26
    27
    28
    29
    30
    31
    32
    33
    34
    35
    36
    37
    38
    39
    40
    41
    42
    43
    44
    45
    46
    47
    48
    49
    50
    51
    52
    53
    54
    55
    56
    57
    58
    59
    60
    61
    62
    <template>
    <div ref="wrapper">
    <slot></slot>
    </div>
    </template>

    <script>
    import BScroll from 'better-scroll'

    export default {
    props: {
    probeType: {
    type: Number,
    default: 1
    },
    click: {
    type: Boolean,
    default: true
    },
    data: {
    type: Array,
    default: null
    }
    },
    mounted() {
    setTimeout(() => {
    this._initScroll()
    }, 20)
    },
    methods: {
    _initScroll() {
    if (!this.$refs.wrapper) {
    return
    }
    this.scroll = new BScroll(this.$refs.wrapper, {
    probeType: this.probeType,
    click: this.click
    })
    },
    enable() {
    this.scroll && this.scroll.enable()
    },
    disable() {
    this.scroll && this.scroll.disable()
    },
    refresh() {
    this.scroll && this.scroll.refresh()
    }
    },
    watch: {
    data() {
    setTimeout(() => {
    this.refresh()
    }, 20)
    }
    }
    }

    </script>

    <style scoped lang="stylus" rel="stylesheet/stylus">
    </style>
  2. recommend.vue中添加loadImage

    1
    2
    3
    4
    5
    6
    7
    loadImage() {
    // this.checkloaded:标志位, 只计算一次
    if (!this.checkloaded) {
    this.checkloaded = true
    this.$refs.scroll.refresh()
    }
    },

vue-lazyloadvue-lazyload 懒加载插件介绍和应用

  1. main.js

    1
    2
    3
    4
    import VueLazyload from 'vue-lazyload'
    Vue.use(VueLazyload, {
    loading: require('common/image/default.png')
    })
  2. recommend.vue

    1
    <img width="60" height="60"  v-lazy="item.imgurl">
  3. fastclick避免拦截, 加class needsclick

    1
    <img class="needsclick" @load="loadImage" :src="item.picUrl">

loading 基础组件的开发和应用

  1. 添加基础组件loading.vue 在 recommend.vue中使用
    1
    2
    3
    4
    5
    6
    7
    8
    9
    10
    11
    12
    13
    14
    15
    16
    17
    18
    19
    20
    21
    22
    23
    24
    25
    26
    <template>
    <div class="loading">
    <img width="24" height="24" src="./loading.gif">
    <p class="desc">{{title}}</p>
    </div>
    </template>
    <script>
    export default {
    props: {
    title: {
    type: String,
    default: '正在载入...'
    }
    }
    }
    </script>
    <style scoped lang="stylus" rel="stylesheet/stylus">
    @import "~common/stylus/variable"
    .loading
    width: 100%
    text-align: center
    .desc
    line-height: 20px
    font-size: $font-size-small
    color: $color-text-l
    </style>

Vue.js 中,7种定义组件模板的方法

Posted on 2017-07-24 | In 技术

Vue.js 中,7种定义组件模板的方法 | Codementor

本文转载自:众成翻译
译者:Mcbai
审校: huangxiaolu
链接:http://www.zcfy.cc/article/3644
原文:https://www.codementor.io/vuejsdevelopers/7-ways-to-define-a-component-template-in-vue-js-8wxxhmxo6

有多种方式可以在vue中定义模板组件。我算了一下,至少有7种不同的方法:

  • 字符串(String)

  • 模板字符串(Template literal)

  • X-Templates

  • 内联(Inline)

  • Render函数(Render functions)

  • JSX

  • 单文件组件(Single page components)

当然,可能还有更多方法!

在这篇文章里,我们将会展示每一个方法的示例,分析其优缺点,以便你能明白在特定的情形下,哪种方式是合适的。

_注意: 这篇文章最初发表在在Vue.js Developers blog上 on 2017/03/24_

1. 字符串

默认情况下,在JS文件里模板会被定义为一个字符串。但是我觉得大家都会同意这种写法很难看懂,它除了有广泛的浏览器支持之外,并没有什么优势。

1
2
3
4
5
6
7
8
9
Vue.component('my-checkbox', {
template: '<div class="checkbox-wrapper" @click="check"><div :class="{ checkbox: true, checked: checked }"></div><div class="title">{{ title }}</div></div>',
data() {
return { checked: false, title: 'Check me' }
},
methods: {
check() { this.checked = !this.checked; }
}
});

2. 模板字符串(Template literals)

通过ES6的模板字符串(反引号)语法,你在定义模板时可以直接换行,这是通过常规的JavaScript字符串没法做到的。
这种写法更容易阅读,并且这种模板字符串语法得到了许多新版本浏览器的支持。当然,为了安全起见,你仍然应该把它转译为ES5的语法形式。

然而,这种方式并不完美,我发现大多数的IDE在语法高亮上做的差强人意,并且在缩进和换行等的格式方面,仍然很痛苦。

1
2
3
4
5
6
7
8
9
10
11
12
Vue.component('my-checkbox', {
template: `<div class="checkbox-wrapper" @click="check">
<div :class="{ checkbox: true, checked: checked }"></div>
<div class="title">{{ title }}</div>
</div>`,
data() {
return { checked: false, title: 'Check me' }
},
methods: {
check() { this.checked = !this.checked; }
}
});

3. X-Templates

使用这种方法,你需要在index.html文件里的script标签中定义你的模板。script标签需要添加text/x-template类型作为标记,并且在定义组件时,通过id来引用。

我喜欢这种方式,它允许你使用真正的HTML标记来书写你的HTML文件,但是不足之处在于,这种方式会把模板和组件其它部分的定义分开。

1
2
3
4
5
6
7
8
9
Vue.component('my-checkbox', {
template: '#checkbox-template',
data() {
return { checked: false, title: 'Check me' }
},
methods: {
check() { this.checked = !this.checked; }
}
});
1
2
3
4
5
6
<script type="text/x-template" id="checkbox-template">
<div class="checkbox-wrapper" @click="check">
<div :class="{ checkbox: true, checked: checked }"></div>
<div class="title">{{ title }}</div>
</div>
</script>

4. 内联模板(Inline Templates)

通过给组件添加inline-template属性来告诉Vue,里面的内容就是模板,而不是把它当作是分发内容(见 slots)。

它的缺点和x-templates一样,但是有一个优点就是,它的内容就在HTML模板对应的位置,所以页面一加载就会渲染,而不用等到JavaScript执行。

1
2
3
4
5
6
7
8
Vue.component('my-checkbox', {
data() {
return { checked: false, title: 'Check me' }
},
methods: {
check() { this.checked = !this.checked; }
}
});
1
2
3
4
5
6
<my-checkbox inline-template>
<div class="checkbox-wrapper" @click="check">
<div :class="{ checkbox: true, checked: checked }"></div>
<div class="title">{{ title }}</div>
</div>
</my-checkbox>

5. Render functions(渲染函数)

渲染函数需要你把模板当作一个JavaScript对象来进行定义,它们是一些复杂并且抽象的模板选项。

然而,它的优点是你定义的模板更接近编译器,你可以使用所有JavaScript方法,而不仅是指令提供的那些功能。

1
2
3
4
5
6
7
8
9
10
11
12
13
14
15
16
17
18
19
20
21
22
23
24
25
26
27
28
29
30
31
32
33
34
35
36
37
38
39
40
41
Vue.component('my-checkbox', {
data() {
return { checked: false, title: 'Check me' }
},
methods: {
check() { this.checked = !this.checked; }
},
render(createElement) {
return createElement(
'div',
{
attrs: {
'class': 'checkbox-wrapper'
},
on: {
click: this.check
}
},
[
createElement(
'div',
{
'class': {
checkbox: true,
checked: this.checked
}
}
),
createElement(
'div',
{
attrs: {
'class': 'title'
}
},
[ this.title ]
)
]
);
}
});

6. JSX

Vue中最有争议性的模板选项就是JSX,一些开发者认为JSX语法太丑,不直观,而且和Vue的简洁特性背道而驰。

JSX需要事先编译,因为浏览器并不支持JSX。但是如果你需要使用渲染函数,那么JSX语法绝对是一种更简洁的定义模板的方法。

1
2
3
4
5
6
7
8
9
10
11
12
13
14
Vue.component('my-checkbox', {
data() {
return { checked: false, title: 'Check me' }
},
methods: {
check() { this.checked = !this.checked; }
},
render() {
return <div class="checkbox-wrapper" onClick={ this.check }>
<div class={{ checkbox: true, checked: this.checked }}></div>
<div class="title">{ this.title }</div>
</div>
}
});

7. 单文件组件(Single File Components)

只要你愿意在项目中使用构建工具,那么单文件组件绝对是这些方法中的首选。它们有两个最好的优点:允许你使用标记,同时把所有组件定义都写在一个文件中。

尽管单文件组件需要编译,并且一些IDE不支持这种类型文件的语法高亮,但它仍然很难被其它方法战胜。

1
2
3
4
5
6
7
8
9
10
11
12
13
14
15
16
<template>
<div class="checkbox-wrapper" @click="check">
<div :class="{ checkbox: true, checked: checked }"></div>
<div class="title">{{ title }}</div>
</div>
</template>
<script>
export default {
data() {
return { checked: false, title: 'Check me' }
},
methods: {
check() { this.checked = !this.checked; }
}
}
</script>

你可能会举出还有更多的方式来定义模板,因为你还可以使用一些模板预处理器,比如Pug!

哪个最好?

当然没有完美的方法,你应该根据你的实际情况来进行判断。我觉得一个好的程序员应该知道所有的方式,并把它们当作Vue.js技术栈里一种解决问题的工具。

Vue 2.0 高级实战-开发移动端音乐WebApp 课程笔记(第三章 页面骨架开发)

Posted on 2017-07-20 | In 技术 , 课程笔记

Vue 2.0 高级实战-开发移动端音乐WebApp 课程笔记(第三章 页面骨架开发)

页面入口+header 组件的编写

index.js 添加 viewport

1
2
3
4
5
6
7
8
9
10
11
12
13
<!DOCTYPE html>
<html>
<head>
<meta charset="utf-8">
<meta name="viewport"
content="width=device-width, initial-scale=1.0, maximum-scale=1.0, minimum-scale=1.0, user-scalable=no">
<title>vue-music</title>
</head>
<body>
<div id="app"></div>
<!-- built files will be auto injected -->
</body>
</html>

package.json 添加依赖

1
2
3
4
5
6
7
8
9
{
"dependencies": {
"babel-runtime": "^6.0.0", // es语法转义
"fastclick": "^1.0.6" // 解决 移动端点击300毫秒延迟的问题
},
"devDependencies": {
"babel-polyfill": "^6.2.0" // babel补丁,可以使用es6的一些api
},
}

/src/main.js 引入fastclick

1
2
3
4
5
6
7
8
9
10
11
12
13
14
15
16
17
18
import 'babel-polyfill'
import Vue from 'vue'
import App from './App'
import router from './router'

// 引入fastclick
import fastclick from 'fastclick'

import 'common/stylus/index.styl'

// 使用fastclick
fastclick.attach(document.body)

/* eslint-disable no-new */
new Vue({
el: '#app',
render: h => h(App)
})

创建m-header组件

1
2
3
4
5
6
7
8
9
10
11
12
13
14
15
16
17
18
19
20
21
22
23
24
25
26
27
28
29
30
31
32
33
34
35
36
37
38
39
40
41
42
43
44
<template>
<div class="m-header">
<div class="icon"></div>
<h1 class="text">Chicken Music</h1>
</div>
</template>

<script type="text/ecmascript-6">
export default {}
</script>

<style scoped lang="stylus" rel="stylesheet/stylus">
@import "~common/stylus/variable"
@import "~common/stylus/mixin"
.m-header
position: relative
height: 44px
text-align: center
color: $color-theme
font-size: 0
.icon
display: inline-block
vertical-align: top
margin-top: 6px
width: 30px
height: 32px
margin-right: 9px
bg-image('logo')
background-size: 30px 32px
.text
display: inline-block
vertical-align: top
line-height: 44px
font-size: $font-size-large
.mine
position: absolute
top: 0
right: 0
.icon-mine
display: block
padding: 12px
font-size: 20px
color: $color-theme
</style>

App.vue 引入Header组件

1
2
3
4
5
6
7
8
9
10
11
12
13
14
15
16
17
<template>
<div id="app" @touchmove.prevent>
<m-header></m-header>
</div>
</template>

<script type="text/ecmascript-6">
import MHeader from 'components/m-header/m-header'
export default {
components: {
MHeader
}
}
</script>

<style scoped lang="stylus" rel="stylesheet/stylus">
</style>

webpack.base.conf.js 别名配置

1
2
3
4
5
6
7
8
resolve: {
extensions: ['.js', '.vue', '.json'],
alias: {
'@': resolve('src'),
'common': resolve('src/common'),
'components': resolve('src/components')
}
},

路由配置+ tab 顶导组件开发

router初始化

1
2
3
4
5
6
7
8
9
10
11
12
13
14
15
16
17
18
19
20
21
22
23
24
25
26
27
28
29
30
31
32
33
34
import Vue from 'vue'
import Router from 'vue-router'
import Recommend from 'components/recommend/recommend'
import Singer from 'components/singer/singer'
import Rank from 'components/rank/rank'
import Search from 'components/search/search'

Vue.use(Router)

export default new Router({
routes: [
// 根路径配置
{
path: '/',
redirect: '/recommend'
},
{
path: '/recommend',
component: Recommend
},
{
path: '/singer',
component: Singer
},
{
path: '/rank',
component: Rank
},
{
path: '/search',
component: Search
}
]
})

main.js 引入router

1
2
3
4
5
6
7
8
9
10
11
12
13
14
15
16
import 'babel-polyfill'
import Vue from 'vue'
import App from './App'
import router from './router'
import fastclick from 'fastclick'

import 'common/stylus/index.styl'

fastclick.attach(document.body)

/* eslint-disable no-new */
new Vue({
el: '#app',
router,
render: h => h(App)
})

App.vue 中使用router

1
2
3
4
5
6
<template>
<div id="app" @touchmove.prevent>
<m-header></m-header>
<router-view></router-view>
</div>
</template>

创建tab.vue 组件

1
2
3
4
5
6
7
8
9
10
11
12
13
14
15
16
17
18
19
20
21
22
23
24
25
26
27
28
29
30
31
32
33
34
35
36
37
38
39
40
41
<template>
<div class="tab">
// tag: 渲染的标签
<router-link tag="div" class="tab-item" to="/recommend">
<span class="tab-link">推荐</span>
</router-link>
<router-link tag="div" class="tab-item" to="/singer">
<span class="tab-link">歌手</span>
</router-link>
<router-link tag="div" class="tab-item" to="/rank">
<span class="tab-link">排行
</span>
</router-link>
<router-link tag="div" class="tab-item" to="/search">
<span class="tab-link">搜索</span>
</router-link>
</div>
</template>

<script type="text/ecmascript-6">
export default {}
</script>

<style scoped lang="stylus" rel="stylesheet/stylus">
@import "~common/stylus/variable"
.tab
display: flex
height: 44px
line-height: 44px
font-size: $font-size-medium
.tab-item
flex: 1
text-align: center
.tab-link
padding-bottom: 5px
color: $color-text-l
&.router-link-active
.tab-link
color: $color-theme
border-bottom: 2px solid $color-theme
</style>

App.vue 引入tab组件

1
2
3
4
5
6
7
8
9
10
11
12
13
14
15
16
17
18
19
20
21
22
<template>
<div id="app" @touchmove.prevent>
<m-header></m-header>
<tab></tab>
<router-view></router-view>
</div>
</template>

<script type="text/ecmascript-6">
import MHeader from 'components/m-header/m-header'
import Tab from 'components/tab/tab'

export default {
components: {
MHeader,
Tab
}
}
</script>

<style scoped lang="stylus" rel="stylesheet/stylus">
</style>

坦然面对:应对前端疲劳

Posted on 2017-07-19 | In 技术

坦然面对:应对前端疲劳

本文转载自:众成翻译
译者:学会微笑
审校: huangxiaolu
链接:http://www.zcfy.cc/article/3509
原文:https://www.smashingmagazine.com/2016/11/not-an-imposter-fighting-front-end-fatigue/

我最近和一个做后端开发的朋友讨论我在工作之余花了多长的时间去写码和学习写码。他给我看了Uncle Bob的《Clean Code》这本书中的一段话,它将音乐家们为准备音乐会而花费的时间与开发者让代码正确执行所用的练习时间进行了比较。

我喜欢这个类比,但是我不认为我完全认同它;首先这种想法会导致疲劳。我认为如果你想进一步磨练你的技术并扩大你的技能集,那么这是很好的,但是要一天中每个小时都这样做是很难持续的。

前端疲劳是非常真实的。 我看到过一些关于JavaScript疲劳的文章,但我认为问题远不止于这种特定的语言。

先澄清一下,这篇文章不是在抱怨前端疲劳如何糟糕,以及技术发展太快—— 我喜欢技术迅速发展。同样的,我可以感受到它是如何的势不可挡,也会时不时地感觉自己要落伍了。

据我所知,这是一把双刃剑。

首先作为一个前端开发者,你认为你的技能树里应当有以下所有的技能:

  • HTML (整洁代码,语义化标签)

  • CSS (模块化,可伸缩)

  • CSS 方法 (BEM, SMACSS, OOCSS)

  • CSS 预处理器 (像LESS, SCSS, PostCSS)

  • 现代 CSS (Flexbox, Grid)

  • JS

  • 现代 JS (ES6, Typescript)

  • JS 框架 (Angular, React, Vue [更多的之后在此插入])

  • JS 方法 (函数式编程, 面向对象)

  • JS 库 (Immutable, Ramda, Lodash)

  • 响应式设计原则

  • 测试 (TDD)

  • 测试框架 (Jasmine, Karma)

  • SVG

  • WebGL

  • 动画技术

  • 可访问性

  • 可用性

  • 性能

  • 构建工具 (Grunt, Gulp, NPM 脚本)

  • 资源打包工具 (WebPack, Browserify)

  • NPM 生态系统

  • 了解不同浏览器的怪癖

  • 敏捷方法

  • 版本控制 (通常是 Git)

  • 视觉设计基础

  • 软技能,时间管理

  • 对使用的后端语言有基本的了解。

此外,你还要涉足或展望这些技术:

  • Service workers

  • Progressive Web Apps (PWA)

  • Web组件化

其次,你的日常工作可能不会完全覆盖这些技能,或者不会让你有时间去学所有技术,因此怎样才能在你的控制下去保证会所有的技能?

听说像 “Progressive Web Apps” 的项目对开发人员来说是相当可怕的。新的方法和技巧导致疲劳感 —— 前端疲劳。

开发人员听见“Progressive Web Apps” 这种术语可能会感到畏惧。新的方法和技巧导致疲劳感 —— 前端疲劳。 (图片来源)

现在作为这些技术的消费者,你可能要做的是:

  • 订阅一打不同的开发者周刊简报

  • 添加Twitter订阅

  • 参加每周赶工作的前端团队

  • 在工作之外有轻松的渠道能和一些开发者交流

  • 按照网上的教程 (希望不是过时的)

  • 使用视频课程培训网站像 Frontend Masters

  • 买web开发的书 (希望不是过时的)

  • 参加技术聚会

  • 参加会议

  • 参加培训课程

而作为一个贡献者,你可能要做的是:

  • 写博客/杂志文章

  • 演讲

  • 直播

  • 贡献开源项目

  • 做自己的业余项目

最近我发现我的注意力被分散到三件事情上,我用三分之一的精力写着代码,同时戴着耳机一边听别人讨论代码,一边在Slack上跟别人聊代码。我决定适可而止——我的全部注意力都被代码所占据。我已经精疲力竭了。

虽然这肯定是极端情况,但我相信其他人也经历过类似的事情。最重要的是,你可能有一份全职工作,家庭,朋友,业余爱好。难怪我们中有那么多人感觉力不从心并且怀疑我们是否做了正确的职业选择。

我的一些前端同事都表示想要打包走人,然后换一个可以在五点结束的工作。但我认为前端工作仍旧吸引着某些的人,而如果放弃这份工作,成为一个房地产经纪人,你仍然想尽你的可能成为最好的房地产经纪人。在你的空闲时间你还是会参加房地产会议和跟踪房价趋势。很多个月以前,我在金融业工作,晚上我还在学习,阅读相关资料,想成为我所选择领域中技能最佳的人。

并不是只有这个领域需要付出巨大的精力,许多职业需要投入大量的精力并且在工作之外学习。也许前端开发的特殊之处在于技术发展得如此迅速,以至于好像有人一直在移动目标岗位。这就像每隔一天我就会收到一封电子邮件,上面写着“XYZ”技术已死。我确定这不是真的,否则我们就没有技术可用了。

生态系统处于不断变化的状态,我认为这是一件好事。就我个人而言,我喜欢扮演一个可以不断地学习、发展和督促自己的角色,但这并不是说我不会偶尔感到不知所措。

考虑到这一点,我尝试记住这些事情用来阻止我殚精竭虑,同时也有一些避免疲劳的通用建议。

我们是一样的

我认识的开发者,无论是在工作中还是工作外,都是我认识的最聪明的人。但他们全都会感到不知所措。大多数人都有一些希望学习的技术清单。可能有少数人知道所有技术,而且在所有事情上都处于领先地位,但我们大多数人的处境完全相同。

我们仍然依赖Google和Stack Overflow来度过我们的一天,打开了超多的选项卡,全部是关于Web相关问题的答案。不止你一个人是这样!

要高兴地知道你不是一个糟糕的开发人员,你只是还没有尝试过酷孩子们正在使用的东西。

是的,即使是“web名人”也有同样的困境…

你不可能知道所有的事情,而你在Twitter上追随的明星开发者在小部分的领域中表现得非常好。你会注意到,他们出名的领域恰好是他们所熟知的领域。可能也会有例外,但他们和我们一样也只是个普通人。:)

冒充者综合征是真实的,我们都有

我知道有有些优秀的前端开发人员不会申请职位,因为他们在不知道工作描述要求上的所有东西的情况下,就觉得自己是个骗子。引用其中一个:

“我看到的90%的JDs,会让我感觉“啊,我太落后!” 。事实上,这让我很困扰,我想留在我现在的职位,试图赚更多的钱,只是因为这样让我觉得我已经“摆脱它”。”

事实上,大部分的工作说明都是闹剧。我的朋友Bård把这些说明放在一张大的图片,来展示出前端工作要求和它们的真正含义之间的区别。

招聘广告的解释

招聘广告的解释 (图片来源) (图片来源)

只要记住,会变好的。我所做的每一项工作,我都觉得自己不够深入,但最终你会习惯他们的工具和工作流程,你会学习并成为一个更好的开发人员。

不要害怕在工作中学习,掌握新技能的最佳方法是每天使用它们。

如果你有冒充者综合征,可能你是个正派的开发者,否则你就不会自觉地意识到它。

巩固基础

人们很容易被耀眼的新事物分心,但是如果你的基础还不牢固,那么你所建造的东西将经受不住时间的考验。

就像我的一个好朋友曾经对我说的:

“专注于基础一直是我的口头禅。你能建立良好的项目(SH!T)和解决问题,这才是最重要的,而你如何解决它们(所使用的工具)已经并将永远改变。”

例如,当react一跃成名,它似乎总是和ES6捆绑在一起,我把重点放在语言的那些改变和新特性上而不是框架本身的细微差别。一旦react不火了,我从最新的JavaScript上学到的知识将继续存在下去。你可以在原生chrome玩很多特性,而不用引入Babel陷入依赖地狱。

不用学所有的

这真的很关键。我认为正在扼杀我们的不是新框架、库和模块,而是我们自己必须把它们全部学会的信念。

通过学习我发现最好的办法是专注——此刻我正在钻研ES6中的JavaScript函数式编程。

我的清单上还有很多我想学的东西,但我尽量不分心。例如,我喜欢温习我会的知识,玩Polymer,钻研一些最新的CSS技术,比如Grid,但是如果我一次开始阅读太多不同的领域,我得不到所有的信息。这些别的东西哪儿也去不了,再次看到的时候就能联想到他们。

避免在某一主题上匆忙尝试使用一切。 慢慢来,确保你完全理解它。

如果你像我一样,你会有一个不断增长的清单,但不要害怕从中剔除项目。并不是所有的事情都值得投入时间,你应该试着去认识哪些是值得学习的,哪些可能在几年内消失。花时间来学习编程的设计模式和架构技术,相比于投入在当前火的框架,在长远上来看,总是更有益的。脱离成长轨迹,过不了多久你就会迷失在追逐玩流行语的过程中。

大多数公司没有使用尖端技术

现在有很多新的东西出现,web正在以惊人的速度发展,但通常企业真正在业务中开始采用这些新技术,需要很长的时间。大多数公司会等一段时间待技术成熟,并看到它在领域中被认可。

Angular 是六年前创建的,我刚开始在一家初创公司工作,他认为这是三年前的框架。Reactjs 已经有大约三年的历史了,我现在的公司仅在今年圣诞节前才开始使用它。我确信有很多其他的框架在同一时间出现或者消失。如果所有的我都要去研究,我会发疯的。

在CSS领域,flexbox在2010年就可以用了——六年前!但是浏览器到现在支持仍然有限。我们今年早些时候开始在生产环境中使用它,而且我也不认为它在其他地方被广泛使用。

我的意思是,不必急于学习所有的东西,虽然技术可能会很快发展,但你的潜在雇主正在以较慢的速度前进。你不必走在曲线的前面,只是要确保你在观察它的轨迹。

你学的越多,你会发现你不知道的也越来越多,这没关系

这是完全正常的。当你刚开始的时候,你不知道你不知道什么。然后你会学习一些东西并且认为你是一个天才。然后,渐渐地,这种幻觉被打破,你开始理解事实上在这之外你有多少东西不知道。

从本质上说,你得到的经验越多,你进入的空虚就越深。你需要跟这个和平相处,否则它会消耗你。如果有的话,这种感觉会让你相信你正朝着正确的方向前进。在我们选择的职业中,你永远不会舒舒服服地学会所有前端知识。

不要把你所有的业余时间都花在学习上

你很容易就感觉到你远远落后,需要每分钟都去编码和学习。这是一张通往职业疲倦的单程票。留一些时间来发展你的技能,看看你是否可以与你的老板协商一些时间来保证你的学习时间,然后用剩下的时间来做你爱做的事。

我已经分出一点写代码的时间在健身房。锻炼对你的身心都是极其重要的。尝试每天至少做20到30分钟,可以保持头脑清醒,防止疲劳。

给你的家人和朋友留出时间,尽量不要和他们谈工作!

现在是开发者的市场

目前不要担心找不到工作。此时我们正处于一个非常幸运的点,等待填充的岗位远比开发者要多。我不知道这将持续多久,但现在好好把握它!

你可以在不知道所有技术的情况下得到一份工作。我发现,在我面试过的人中,99%的人完全是在吹牛。

最坏的情况,记住遗留代码中有黄金。如果你是一个喜欢老方式的开发人员,总是会有一些公司依赖于传统技术,需要开发人员在他们的软件上工作。

结论

我希望其中的一些点有助于减轻你可能感到的一些挫折。你能做的最糟糕的事就是到达边缘,完全被烧尽,因为一旦你这样,很难恢复你对你所做的事情的热情,以及你这么做的初衷。

撸码愉快!

(aa, il)

Vue 2.0 高级实战-开发移动端音乐WebApp 课程笔记(第二章 项目准备工作)

Posted on 2017-07-18 | In 技术 , 课程笔记

Vue 2.0 高级实战-开发移动端音乐WebApp 课程笔记(第二章 项目准备工作)

需求分析

vue-cli脚手架安装

1
vue init webpack vue-music

项目目录介绍及图标字体、公共样式等资源准备

src目录介绍

  • src
    • api (后端请求相关代买)
    • common (通用静态资源)
      • fonts
      • image
      • js
      • stylus
        • base.styl (基础样式)
        • icon.styl (图标字体文件)
        • index.styl (样式入口文件)
        • mixin.styl (函数)
        • reset.styl (重置样式文件)
        • variable.styl (变量配置)
    • components (通用组件)
    • router (路由相关文件)
    • store (vuex相关代码)
    • App.vue
    • main.js (入口文件)

variable.styl:设计都有一定的规范,保证风格统一。这个文件定义了颜色规范和字体规范。可以方便知道开发用什么样的颜色,保证开发的方便性。

19+ 个 JavaScript 快速编程技巧 — SitePoint

Posted on 2017-07-18 | In 技术

19+ 个 JavaScript 快速编程技巧 — SitePoint

本文转载自:众成翻译
译者:myvin
链接:http://www.zcfy.cc/article/3519
原文:https://www.sitepoint.com/shorthand-javascript-techniques/

improve-your-javascript

这确实是一篇针对于基于 JavaScript 语言编程的开发者必读的文章。在过去几年我学习 JavaScript 的时候,我写下了这篇文章,并将其作为 JavaScript 快速编程技巧的一个重要参考。为了有助于理解,针对常规写法我也给出了相关的编程观点。

2017 年 6 月 14 日:这篇文章更新了一些基于 ES6 的速记写法。如果你想进一步了解 ES6 中有哪些新增的变化,可以注册 SitePoint Premium 并查看我们录制的视频A Look into ES6。

1. 三元操作符

如果你想只用一行代码写出一个 if..else 表达式,那么这是一个很好的节省代码的方式。

常规写法:

1
2
3
4
5
6
7
const x = 20;
let answer;
if (x > 10) {
answer = 'is greater';
} else {
answer = 'is lesser';
}

速记法:

1
const answer = x > 10 ? 'is greater' : 'is lesser';

你也可以像这样嵌套 if 表达式:

1
const big = x > 10 ? " greater 10" : x

2. 短路求值速记法

当需要给另一个变量分配一个变量时,你可能需要确保变量不是 null、undefined 或者不为空。你可以写一个有多个 if 表达式的语句,你也可以使用短路求值。

常规写法:

1
2
3
if (variable1 !== null || variable1 !== undefined || variable1 !== '') {
let variable2 = variable1;
}

速记法:

1
const variable2 = variable1  || 'new';

你不相信这样可以 work?那就自己测试下吧(把下面的代码复制粘贴到 es6console):

1
2
3
4
5
6
7
let variable1;
let variable2 = variable1 || '';
console.log(variable2 === ''); // prints true

variable1 = 'foo';
variable2 = variable1 || '';
console.log(variable2); // prints foo

3. 变量声明速记法

在函数里声明变量时,如果需要同时声明多个变量,这种速记法能够给你节省大量的时间和空间。

常规写法:

1
2
3
let x;
let y;
let z = 3;

速记法:

1
let x, y, z=3;

4. If 判断变量是否存在速记法

这可能会有些琐碎,但是值得一提。当需要用 if 判断一个变量是否为真时,赋值运算符有时候可以省略。

常规写法:

1
if (likeJavaScript === true)

速记法:

1
if (likeJavaScript)

注意:这两个例子并不是完全相等,只要 likeJavaScript 变量是一个 真值,该表达式就是成立的。

再给出一个例子。如果 “a” 不等于 true,如下:

常规写法:

1
2
3
4
let a;
if ( a !== true ) {
// do something...
}

速记法:

1
2
3
4
let a;
if ( !a ) {
// do something...
}

5. JavaScript 循环速记法

如果你只想跑原生 JavaScript,不想依赖如 JQuery 或 lodash 这样的外部库,那这个小技巧会非常有用。

常规写法:

1
for (let i = 0; i < allImgs.length; i++)

速记法:

1
for (let index in allImgs)

Array.forEach 速记法:

1
2
3
4
5
6
7
8
function logArrayElements(element, index, array) {
console.log("a[" + index + "] = " + element);
}
[2, 5, 9].forEach(logArrayElements);
// logs:
// a[0] = 2
// a[1] = 5
// a[2] = 9

6. 短路求值

如果我们不想为了只是判断一个变量是 null 或 undefined 就分配一个默认值而写六行代码,那么可以使用短路逻辑操作符完成同样的功能,而且只有一行代码。

常规写法:

1
2
3
4
5
6
let dbHost;
if (process.env.DB_HOST) {
dbHost = process.env.DB_HOST;
} else {
dbHost = 'localhost';
}

速记法:

1
const dbHost = process.env.DB_HOST || 'localhost';

7. 十进制基数指数

你可能随处可见这种写法。这是一种比较 fancy 的写法,省去了后面的一堆零。举个栗子,1e7 就意味着 1 后面跟着 7 个零。这是十进制基数指数的一种写法(JavaScript 会按照浮点类型去解释),和 10,000,000 是相等的。

常规写法:

1
for (let i = 0; i < 10000; i++) {}

速记法:

1
2
3
4
5
6
7
8
9
for (let i = 0; i < 1e7; i++) {}

// All the below will evaluate to true
1e0 === 1;
1e1 === 10;
1e2 === 100;
1e3 === 1000;
1e4 === 10000;
1e5 === 100000;

8. 对象属性速记法

在 JavaScript 中定义对象字面量非常简单。ES6 提供了一个更简单的定义对象属性的方法。如果 name 和 key 名字相同,那么就可以直接使用如下速记法。

常规写法:

1
const obj = { x:x, y:y };

速记法:

1
const obj = { x, y };

9. 箭头函数速记法

经典的函数写法易于阅读,但是一旦将这样的函数放进回调中就会略显冗长,而且会造成一些困惑。

常规写法:

1
2
3
4
5
6
7
8
9
10
11
function sayHello(name) {
console.log('Hello', name);
}

setTimeout(function() {
console.log('Loaded')
}, 2000);

list.forEach(function(item) {
console.log(item);
});

速记法:

1
2
3
4
5
sayHello = name => console.log('Hello', name);

setTimeout(() => console.log('Loaded'), 2000);

list.forEach(item => console.log(item));

这里需要注意的是:this 值在箭头函数和常规写法的函数里是完全不同的,所以那两个例子并不是严格等价的。查看 this article on arrow function syntax获取更多细节。

10. 隐性返回速记法

我们经常使用 return 关键字来返回一个函数的结果。仅有一个表达式的箭头函数会隐性返回函数结果(函数必须省略大括号({})才能省略 return 关键字)。

如果要返回多行表达式(比如一个对象字面量),那么需要用 () 而不是 {} 来包裹函数体。这样可以确保代码作为一个单独的表达式被计算返回。

常规写法:

1
2
3
function calcCircumference(diameter) {
return Math.PI * diameter
}

速记法:

1
2
3
calcCircumference = diameter => (
Math.PI * diameter;
)

11. 默认参数值

你可以使用 if 表达式为函数参数定义默认值。在 ES6 中,你可以在函数声明的时候直接定义默认值。

常规写法:

1
2
3
4
5
6
7
function volume(l, w, h) {
if (w === undefined)
w = 3;
if (h === undefined)
h = 4;
return l * w * h;
}

速记法:

1
2
3
volume = (l, w = 3, h = 4 ) => (l * w * h);

volume(2) //output: 24

12. 模板字面量

你是不是已经厌倦了使用 ' + ' 来将多个变量拼接成一个字符串?难道就没有更简单的方式来完成吗?如果你可以使用 ES6 的话,那么恭喜你,你要做的只是使用反引号和 ${} 来包裹你的变量。

常规写法:

1
2
3
const welcome = 'You have logged in as ' + first + ' ' + last + '.'

const db = 'http://' + host + ':' + port + '/' + database;

速记法:

1
2
3
const welcome = `You have logged in as ${first} ${last}`;

const db = `http://${host}:${port}/${database}`;

13. 解构赋值速记法

如果你正在使用任意一种流行的 web 框架,那么你很有可能会使用数组或者对象字面量形式的数据在组件和 API 之间传递信息。一旦组件接收到数据对象,你就需要将其展开。

常规写法:

1
2
3
4
5
6
7
8
9
const observable = require('mobx/observable');
const action = require('mobx/action');
const runInAction = require('mobx/runInAction');

const store = this.props.store;
const form = this.props.form;
const loading = this.props.loading;
const errors = this.props.errors;
const entity = this.props.entity;

速记法:

1
2
3
import { observable, action, runInAction } from 'mobx';

const { store, form, loading, errors, entity } = this.props;

你甚至可以给变量重新分配变量名:

1
const { store, form, loading, errors, entity:contact } = this.props;

14. 多行字符串速记法

如果你需要在代码中写多行字符串,那么你可能会这样写:

常规写法:

1
2
3
4
5
6
const lorem = 'Lorem ipsum dolor sit amet, consectetur\n\t'
+ 'adipisicing elit, sed do eiusmod tempor incididunt\n\t'
+ 'ut labore et dolore magna aliqua. Ut enim ad minim\n\t'
+ 'veniam, quis nostrud exercitation ullamco laboris\n\t'
+ 'nisi ut aliquip ex ea commodo consequat. Duis aute\n\t'
+ 'irure dolor in reprehenderit in voluptate velit esse.\n\t'

但是有一种更简单的方法:使用反引号。

速记法:

1
2
3
4
5
6
const lorem = `Lorem ipsum dolor sit amet, consectetur
adipisicing elit, sed do eiusmod tempor incididunt
ut labore et dolore magna aliqua. Ut enim ad minim
veniam, quis nostrud exercitation ullamco laboris
nisi ut aliquip ex ea commodo consequat. Duis aute
irure dolor in reprehenderit in voluptate velit esse.`

15. 展开运算符速记

展开运算符是在 ES6 中引入的,它的多种应用场景使得 JavaScript 代码使用起来更高效、更有趣。它可以用来替换某些数组函数。展开运算符写起来很简单,就是三个点。

常规写法:

1
2
3
4
5
6
7
// joining arrays
const odd = [1, 3, 5];
const nums = [2 ,4 , 6].concat(odd);

// cloning arrays
const arr = [1, 2, 3, 4];
const arr2 = arr.slice()

速记法:

1
2
3
4
5
6
7
8
// joining arrays
const odd = [1, 3, 5 ];
const nums = [2 ,4 , 6, ...odd];
console.log(nums); // [ 2, 4, 6, 1, 3, 5 ]

// cloning arrays
const arr = [1, 2, 3, 4];
const arr2 = [...arr];

和 concat() 函数不同,你可以在另一个数组里的任意位置插入一个数组。

1
2
const odd = [1, 3, 5 ];
const nums = [2, ...odd, 4 , 6];

你也可以将展开运算符和 ES6 解析赋值结合起来使用:

1
2
3
4
const { a, b, ...z } = { a: 1, b: 2, c: 3, d: 4 };
console.log(a) // 1
console.log(b) // 2
console.log(z) // { c: 3, d: 4 }

16. 强制参数速记法

如果没有传值的话,JavaScript 默认会将函数参数设置为 undefined。一些其他的编程语言会抛出警告或错误。为了强制给参数赋值,如果参数没有定义的话,你可以使用 if 表达式抛出错误,或者可以使用“强制参数速记法”。

常规写法:

1
2
3
4
5
6
function foo(bar) {
if(bar === undefined) {
throw new Error('Missing parameter!');
}
return bar;
}

速记法:

1
2
3
4
5
6
7
mandatory = () => {
throw new Error('Missing parameter!');
}

foo = (bar = mandatory()) => {
return bar;
}

17. Array.find 速记法

如果你曾经使用原生 JavaScript 写一个查找函数,你可能会使用 for 循环。在 ES6 中,你可以使用数组的一个新方法 find()。

常规写法:

1
2
3
4
5
6
7
8
9
10
11
12
13
const pets = [
{ type: 'Dog', name: 'Max'},
{ type: 'Cat', name: 'Karl'},
{ type: 'Dog', name: 'Tommy'},
]

function findDog(name) {
for(let i = 0; i<pets.length; ++i) {
if(pets[i].type === 'Dog' && pets[i].name === name) {
return pets[i];
}
}
}

速记法:

1
2
pet = pets.find(pet => pet.type ==='Dog' && pet.name === 'Tommy');
console.log(pet); // { type: 'Dog', name: 'Tommy' }

18. Object [key] 速记法

你知道 Foo.bar 可以写成 Foo['bar'] 吧。一开始,似乎并没有原因解释说为什么应该像这样写。但是这种写法可以让你编写可重用代码。

考虑下一个验证函数的简单例子:

1
2
3
4
5
6
7
8
9
function validate(values) {
if(!values.first)
return false;
if(!values.last)
return false;
return true;
}

console.log(validate({first:'Bruce',last:'Wayne'})); // true

这个函数完美的实现了所需的功能。但是,请考虑一个场景:你有许多表单需要验证,并且不同的域有不同的验证规则。那创建一个在运行时被配置的通用验证函数岂不是更好?

速记法:

1
2
3
4
5
6
7
8
9
10
11
12
13
14
15
16
17
18
19
20
21
22
23
24
// object validation rules
const schema = {
first: {
required:true
},
last: {
required:true
}
}

// universal validation function
const validate = (schema, values) => {
for(field in schema) {
if(schema[field].required) {
if(!values[field]) {
return false;
}
}
}
return true;
}

console.log(validate(schema, {first:'Bruce'})); // false
console.log(validate(schema, {first:'Bruce',last:'Wayne'})); // true

现在创建了一个可以在所有的表单里重用的验证函数,而不必为每个表单单独写一个特定的验证函数。

19. 双位取反运算符速记法

逐位运算符是你在刚学习 JavaScript 时会学到的一个特性,但是如果你不处理二进制的话,基本上是从来都不会用上的。

但是,双位运算符有一个非常实用的使用场景:可以用来代替 Math.floor。双位取反运算符的优势在于它执行相同操作的速度更快。你可以在这里查看更多关于位运算符的知识。

常规写法:

1
Math.floor(4.9) === 4  //true

速记法:

1
~~4.9 === 4  //true

20. 还有其他的小技巧?

我确实喜欢这些小技巧,也乐于发现更多的小技巧。如果你有什么想说的话,就直接留言吧!

Vue 2.0 高级实战-开发移动端音乐WebApp 课程笔记(第一章 课程内容介绍)

Posted on 2017-07-16 | In 技术 , 课程笔记

Vue 2.0 高级实战-开发移动端音乐WebApp 课程笔记(第一章 课程内容介绍)

应用的分层逻辑结构模型(总体结构)

总体结构

课程收获

  • 了解一个中度复杂的应用开发
    • 拆分目录
    • 设计路由
    • 设计数据结构
  • 掌握vue.js的高级应用
    • vuex的状态管理
    • 组件间的数据共享
    • 在路由间跳转并传递复杂的数据
    • 懒加载
  • 学会组件化, 模块化的开发方式
    • 什么时候该抽象一个组件, 该抽象基础组件还是通用组件还是应用组件
    • 如何设计和开发一个组件
  • 了解原生App体验交互的实现原理
1…678

Taohong

记录前端技术,学习心得与生活感悟

80 posts
6 categories
65 tags
© 2020 Taohong
Powered by Hexo
|
Theme — NexT.Muse v5.1.4