开发工具转换
登录百度小程序开发工具,在工具菜单,有一个一键转换微信的小程序为百度小程序。(前提:有审核通过的appid,并且登录开发者工具)
npm 工具
1 | // 安装: |
手工转换
参考链接
微信和小程序大同小异, 这里通过对比两者的不同点帮助知识迁移.
| 名称 | 微信 | 支付宝 |
|---|---|---|
| 命名空间 | wx | my |
| 文件类型 | js, wxml, wxss, json | js, axml, acss, json |
| 绑定事件从bind改为on开头,并且采用驼峰形式 | bindchange=”xx” | onChange=”xx |
| if 和 for语句写法不同 | wx:if wx:for | a:if a:for |
window对象设置
微信1
2
3
4
5
6{
"navigationBarBackgroundColor": "#ffffff",
"navigationBarTitleText": "微信接口功能演示",
"enablePullDownRefresh":true,
"disableScroll":true
}
支付宝1
2
3
4
5
6{
"titleBarColor: "#ffffff",
"defaultTitle": "页面标题",
"pullRefresh": true,
"allowsBounceVertical": "YES"
}
tabBar1
2
3
4
5
6
7
8
9
10
11
12
13
14
15{
"tabBar": {
"color": "#999",
"selectedColor": "#333",
"backgroundColor": "#ffffff",
"list": [
{
"pagePath": "pages/index/index",
"text": "首页",
"iconPath": "icons/1.png"
"selectedIconPath": "icons/1_c.png",
}
]
}
}
支付宝1
2
3
4
5
6
7
8
9
10
11
12
13
14
15{
"tabBar": {
"textColor": "#999",
"selectedColor": "#333",
"backgroundColor": "#ffffff",
"items": [
{
"pagePath": "pages/index/index",
"name": "首页"
"icon":"icons/1.png",
"activeIcon":"icons/1_c.png"
}
]
}
}
JS模块化, 支付宝支持 ES6 语法
支付宝支持引入社区上的第三反方NPM,微信则对引入的NPM有规定的格式。
微信1
2
3const foo = require('foo');
...
module.exports.bar = bar;
支付宝1
2
3import foo from 'foo'
...
export default bar;
支付宝条件循环和列表循环和微信不同的地方是修改了命名空间, 如 wx:if->a:if
支付宝支持对象扩展符...1
<template is="objectCombine" data="{{...obj1, ...obj2, e: 5}}"></template>
微信中使用wxs, 支付宝中使用sjs
支付宝
示例1
2
3
4
5
6
7
8
9
10
11
12
13
14
15
16
17
18
19// /components/customer/index.json
{
"component": true
}
// /components/customer/index.js
Component({
mixins: [], // minxin 方便复用代码
data: { x: 1 }, // 组件内部数据
props: { y: 1 }, // 可给外部传入的属性添加默认值
didMount(){}, // 生命周期函数
didUpdate(){},
didUnmount(){},
methods: { // 自定义事件
handleTap() {
this.setData({ x: this.data.x + 1}); // 可使用 setData 改变内部属性
},
},
})
1 | <!-- // /components/customer/index.axml --> |
使用
1 | // /pages/index/index.json |
1 | <!-- /pages/index/index.axml --> |
支付宝多了很多微信没有的扩展组件, 非常有参考价值
常用api对比
| 说明 | 微信 | 支付宝 |
|---|---|---|
| wx.request() | my.httpRequest() | |
| wx.login() | my.getAuthCode() | |
| wx.showModal() | my.confirm() | |
| wx.getUserInfo() | my.getAuthUserInfo() | |
| wx.requestPayment() | my.tradePay() | |
| wx.saveImageToPhotosAlbum() | my.saveImage() | |
| #导航栏标题 | wx.setNavigationBarTitle() | my.setNavigationBar() |
| #导航栏颜色 | wx.setNavigationBarColor() | my.setNavigationBar() |
| #粘贴板 | wx.getClipboardData() | my.getClipboard() |
| #粘贴板 | wx.setClipboardData() | my.setClipboard() |
| #1.1.3 当前画布的内容导出生成图片 | wx.canvasToTempFilePath() | my.toTempFilePath() |
| wx.scanCode() | my.scan() | |
| wx.closeBLEConnection() | my.disconnectBLEDevice() |
参考链接
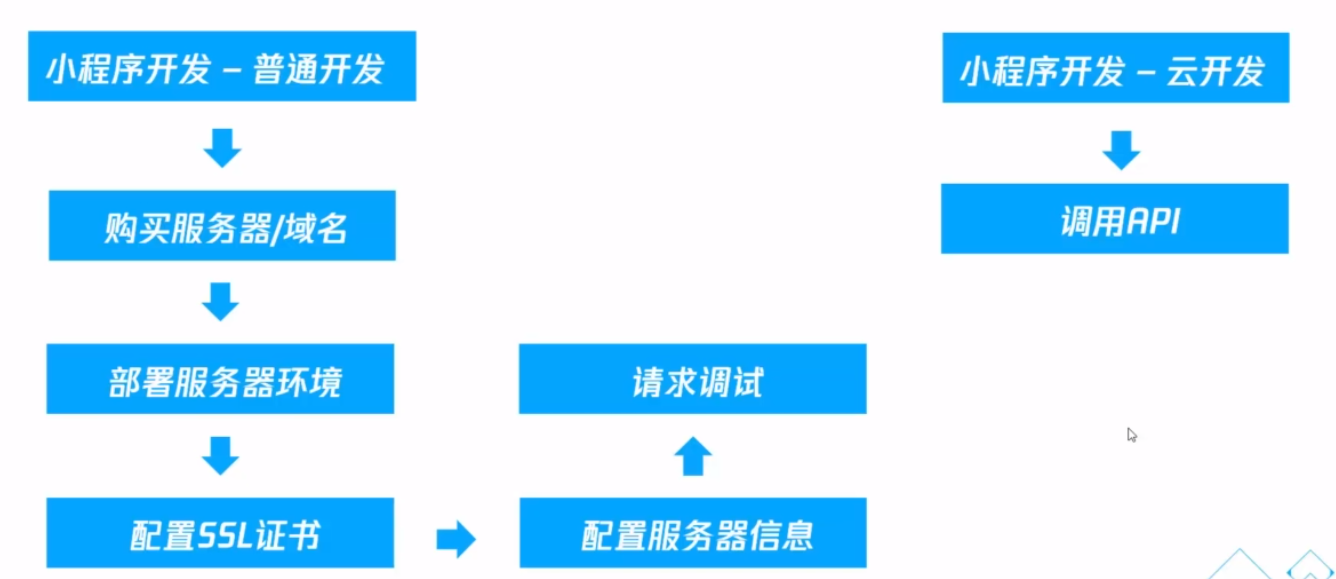
传统小程序需要架构完整的小程序请求端来对数据进行处理, 对开发者的运维要求比较高.
云开发为开发者提供完整的云端支持,弱化后端和运维概念,无需搭建服务器,使用平台提供的 API 进行核心业务开发,即可实现快速上线和迭代,同时这一能力,同开发者已经使用的云服务相互兼容,并不互斥。
project.config.json 中增加了字段 cloudfunctionRoot 用于指定存放云函数的目录
云开发能力从基础库 2.2.3 开始支持, 如果兼容之前的版本, 要在 app.json 中添加 "could":true 字段
在小程序端开始使用云能力前,需先调用 wx.cloud.init 方法完成云能力初始化(注意小程序需先开通云服务,开通的方法是点击工具栏左上角的 “控制台” 按钮)。因此,如果要使用云能力,通常我们在小程序初始化时即调用这个方法。
env 是 wx.cloud.init 的一个参数
开通云开发之前会分配两个环境, 一般一个作为正式环境, 一个作为测试环境
简而言是, 就是 MongoDB.
有方便的权限管理
| 模式 | 小程序端 读自己创建的数据 | 小程序端 写自己创建的数据 | 小程序端 \n 读他人创建的数据 | 小程序端 写他人创建的数据 | 管理端 读写任意数据 |
|---|---|---|---|---|---|
| 仅创建者可写,所有人可读 | √ | √ | √ | × | √ |
| 仅创建者可读写 | √ | √ | × | × | √ |
| 仅管理端可写,所有人可读 | √ | × | √ | × | √ |
| 仅管理端可读写:该数据只有管理端可读写 | × | × | × | × | √ |
云开发的云函数的独特优势在于与微信登录鉴权的无缝整合。当小程序端调用云函数时,云函数的传入参数中会被注入小程序端用户的 openid,开发者无需校验 openid 的正确性,因为微信已经完成了这部分鉴权,开发者可以直接使用该 openid。与 openid 一起同时注入云函数的还有小程序的 appid。
从小程序端调用云函数时,开发者可以在云函数内使用 wx-server-sdk 提供的 getWXContext 方法获取到每次调用的上下文(appid、openid 等),无需维护复杂的鉴权机制,即可获取天然可信任的用户登录态(openid)。
原文链接: https://segmentfault.com/a/1190000007688656
英文pdf: https://code.visualstudio.com/shortcuts/keyboard-shortcuts-windows.pdf
| 按 Press | 功能 Function |
|---|---|
| Ctrl + Shift + P,F1 | 显示命令面板 Show Command Palette |
| Ctrl + P | 快速打开 Quick Open |
| Ctrl + Shift + N | 新窗口/实例 New window/instance |
| Ctrl + Shift + W | 关闭窗口/实例 Close window/instance |
| 按 Press | 功能 Function |
|---|---|
| Ctrl+X | 剪切行(空选定) Cut line (empty selection) |
| Ctrl+C | 复制行(空选定)Copy line (empty selection) |
| Alt+ ↑ / ↓ | 向上/向下移动行 Move line up/down |
| Shift+Alt + ↓ / ↑ | 向上/向下复制行 Copy line up/down |
| Ctrl+Shift+K | 删除行 Delete line |
| Ctrl+Enter | 在下面插入行 Insert line below |
| Ctrl+Shift+Enter | 在上面插入行 Insert line above |
| Ctrl+Shift+\ | 跳到匹配的括号 Jump to matching bracket |
| Ctrl+] / [ | 缩进/缩进行 Indent/outdent line |
| Home | 转到行首 Go to beginning of line |
| End | 转到行尾 Go to end of line |
| Ctrl+Home | 转到文件开头 Go to beginning of file |
| Ctrl+End | 转到文件末尾 Go to end of file |
| Ctrl+↑ / ↓ | 向上/向下滚动行 Scroll line up/down |
| Alt+PgUp / PgDown | 向上/向下滚动页面 Scroll page up/down |
| Ctrl+Shift+[ | 折叠(折叠)区域 Fold (collapse) region |
| Ctrl+Shift+] | 展开(未折叠)区域 Unfold (uncollapse) region |
| Ctrl+K Ctrl+[ | 折叠(未折叠)所有子区域 Fold (collapse) all subregions |
| Ctrl+K Ctrl+] | 展开(未折叠)所有子区域 Unfold (uncollapse) all subregions |
| Ctrl+K Ctrl+0 | 折叠(折叠)所有区域 Fold (collapse) all regions |
| Ctrl+K Ctrl+J | 展开(未折叠)所有区域 Unfold (uncollapse) all regions |
| Ctrl+K Ctrl+C | 添加行注释 Add line comment |
| Ctrl+K Ctrl+U | 删除行注释 Remove line comment |
| Ctrl+/ | 切换行注释 Toggle line comment |
| Shift+Alt+A | 切换块注释 Toggle block comment |
| Alt+Z | 切换换行 Toggle word wrap |
| 按 Press | 功能 Function |
|---|---|
| Ctrl + T | 显示所有符号 Show all Symbols |
| Ctrl + G | 转到行… Go to Line… |
| Ctrl + P | 转到文件… Go to File… |
| Ctrl + Shift + O | 转到符号… Go to Symbol… |
| Ctrl + Shift + M | 显示问题面板 Show Problems panel |
| F8 | 转到下一个错误或警告 Go to next error or warning |
| Shift + F8 | 转到上一个错误或警告 Go to previous error or warning |
| Ctrl + Shift + Tab | 导航编辑器组历史记录 Navigate editor group history |
| Alt + ←/→ | 返回/前进 Go back / forward |
| Ctrl + M | 切换选项卡移动焦点 Toggle Tab moves focus |
| 按 Press | 功能 Function |
|---|---|
| Ctrl + F | 查找 Find |
| Ctrl + H | 替换 Replace |
| F3 / Shift + F3 | 查找下一个/上一个 Find next/previous |
| Alt + Enter | 选择查找匹配的所有出现 Select all occurences of Find match |
| Ctrl + D | 将选择添加到下一个查找匹配 Add selection to next Find match |
| Ctrl + K Ctrl + D | 将最后一个选择移至下一个查找匹配项 Move last selection to next Find match |
| Alt + C / R / W | 切换区分大小写/正则表达式/整个词 Toggle case-sensitive / regex / whole word |
| 按 Press | 功能 Function |
|---|---|
| Alt +单击 | 插入光标 Insert cursor |
| Ctrl + Alt +↑/↓ | 在上/下插入光标 Insert cursor above / below |
| Ctrl + U | 撤消上一个光标操作 Undo last cursor operation |
| Shift + Alt + I | 在选定的每一行的末尾插入光标 Insert cursor at end of each line selected |
| Ctrl + I | 选择当前行 Select current line |
| Ctrl + Shift + L | 选择当前选择的所有出现 Select all occurrences of current selection |
| Ctrl + F2 | 选择当前字的所有出现 Select all occurrences of current word |
| Shift + Alt + → | 展开选择 Expand selection |
| Shift + Alt + ← | 缩小选择 Shrink selection |
| Shift + Alt + (拖动鼠标) | 列(框)选择 Column (box) selection |
| Ctrl + Shift + Alt +(箭头键) | 列(框)选择 Column (box) selection |
| Ctrl + Shift + Alt + PgUp / PgDown | 列(框)选择页上/下 Column (box) selection page up/down |
| 按 Press | 功能 Function |
|---|---|
| Ctrl + 空格 | 触发建议 Trigger suggestion |
| Ctrl + Shift + Space | 触发器参数提示 Trigger parameter hints |
| Tab | Emmet 展开缩写 Emmet expand abbreviation |
| Shift + Alt + F | 格式化文档 Format document |
| Ctrl + K Ctrl + F | 格式选定区域 Format selection |
| F12 | 转到定义 Go to Definition |
| Alt + F12 | Peek 定义 Peek Definition |
| Ctrl + K F12 | 打开定义到边 Open Definition to the side |
| Ctrl + . | 快速解决 Quick Fix |
| Shift + F12 | 显示引用 Show References |
| F2 | 重命名符号 Rename Symbol |
| Ctrl + K Ctrl + X | 修剪尾随空格 Trim trailing whitespace |
| Ctrl + K M | 更改文件语言 Change file language |
| 按 Press | 功能 Function |
|---|---|
| Ctrl+F4, Ctrl+W | 关闭编辑器 Close editor |
| Ctrl+K F | 关闭文件夹 Close folder |
| Ctrl+\ | 拆分编辑器 Split editor |
| Ctrl+ 1 / 2 / 3 | 聚焦到第 1,第 2 或第 3 编辑器组 Focus into 1st, 2nd or 3rd editor group |
| Ctrl+K Ctrl+ ←/→ | 聚焦到上一个/下一个编辑器组 Focus into previous/next editor group |
| Ctrl+Shift+PgUp / PgDown | 向左/向右移动编辑器 Move editor left/right |
| Ctrl+K ← / → | 移动活动编辑器组 Move active editor group |
| 按 Press | 功能 Function |
|---|---|
| Ctrl+N | 新文件 New File |
| Ctrl+O | 打开文件… Open File… |
| Ctrl+S | 保存 Save |
| Ctrl+Shift+S | 另存为… Save As… |
| Ctrl+K S | 全部保存 Save All |
| Ctrl+F4 | 关闭 Close |
| Ctrl+K Ctrl+W | 关闭所有 Close All |
| Ctrl+Shift+T | 重新打开关闭的编辑器 Reopen closed editor |
| Ctrl+K | 输入保持打开 Enter Keep Open |
| Ctrl+Tab | 打开下一个 Open next |
| Ctrl+Shift+Tab | 打开上一个 Open previous |
| Ctrl+K P | 复制活动文件的路径 Copy path of active file |
| Ctrl+K R | 显示资源管理器中的活动文件 Reveal active file in Explorer |
| Ctrl+K O | 显示新窗口/实例中的活动文件 Show active file in new window/instance |
| 按 Press | 功能 Function |
|---|---|
| F11 | 切换全屏 Toggle full screen |
| Shift+Alt+1 | 切换编辑器布局 Toggle editor layout |
| Ctrl+ = / - | 放大/缩小 Zoom in/out |
| Ctrl+B | 切换侧栏可见性 Toggle Sidebar visibility |
| Ctrl+Shift+E | 显示浏览器/切换焦点 Show Explorer / Toggle focus |
| Ctrl+Shift+F | 显示搜索 Show Search |
| Ctrl+Shift+G | 显示 Git Show Git |
| Ctrl+Shift+D | 显示调试 Show Debug |
| Ctrl+Shift+X | 显示扩展 Show Extensions |
| Ctrl+Shift+H | 替换文件 Replace in files |
| Ctrl+Shift+J | 切换搜索详细信息 Toggle Search details |
| Ctrl+Shift+C | 打开新命令提示符/终端 Open new command prompt/terminal |
| Ctrl+Shift+U | 显示输出面板 Show Output panel |
| Ctrl+Shift+V | 切换 Markdown 预览 Toggle Markdown preview |
| Ctrl+K V | 从旁边打开 Markdown 预览 Open Markdown preview to the side |
| 按 Press | 功能 Function |
|---|---|
| F9 | 切换断点 Toggle breakpoint |
| F5 | 开始/继续 Start/Continue |
| Shift+F5 | 停止 Stop |
| F11 / Shift+F11 | 下一步/上一步 Step into/out |
| F10 | 跳过 Step over |
| Ctrl+K Ctrl+I | 显示悬停 Show hover |
| 按 Press | 功能 Function |
|---|---|
| Ctrl+` | 显示集成终端 Show integrated terminal |
| Ctrl+Shift+` | 创建新终端 Create new terminal |
| Ctrl+Shift+C | 复制选定 Copy selection |
| Ctrl+Shift+V | 粘贴到活动端子 Paste into active terminal |
| Ctrl+↑ / ↓ | 向上/向下滚动 Scroll up/down |
| Shift+PgUp / PgDown | 向上/向下滚动页面 Scroll page up/down |
| Ctrl+Home / End | 滚动到顶部/底部 Scroll to top/bottom |
最重要的功能就是F1或Ctrl+Shift+P打开的命令面板了,在这个命令框里可以执行VSCode的任何一条命令,甚至关闭这个编辑器。
按一下Backspace会进入到Ctrl+P模式里
在Ctrl+P下输入>又可以回到Ctrl+Shift+P模式。
在Ctrl+P窗口下还可以直接输入文件名,跳转到文件
在浏览项目时,Explorer非常适合在文件之间导航。但是,当您处理任务时,您会发现自己在同一组文件之间快速跳转。VS Code提供了两个功能强大的命令,可以通过易于使用的键绑定在文件中导航和跨文件导航。
按住Ctrl键并按Tab键查看编辑器组中打开的所有文件的列表。要打开其中一个文件,请再次使用Tab选择要导航到的文件,然后释放Ctrl以将其打开。
或者,您可以使用Alt + Left和Alt + Right在文件和编辑位置之间导航。如果您在同一文件的不同行之间跳转,这些快捷方式允许您轻松地在这些位置之间导航。
提示:键入
Ctrl + P(快速打开)时,可以按名称打开任何文件。
如果某种语言支持它,您可以按F12转到符号的定义。
如果按Ctrl键并将鼠标悬停在符号上,将显示声明的预览:

提示:您可以使用
Ctrl +单击跳转到定义,或使用Ctrl + Alt +单击打开侧面的定义。
某些语言还支持通过从编辑器上下文菜单或命令选项板运行“ 转到类型定义”命令来跳转到符号的类型定义。这将带您到符号类型的定义。命令editor.action.goToTypeDefinition默认情况下不绑定到键盘快捷键,但您可以添加自己的自定义键绑定。
语言还可以通过按Ctrl+F12支持跳转到符号的实现。对于接口,它显示了该接口的所有实现者,对于抽象方法,这显示了该方法的所有具体实现。
您可以使用Ctrl+Shift+O在文件内导航符号。通过键入:符号将按类别分组。按向上或向下键并导航到所需的位置。
某些语言支持使用Ctrl+T跨文件跳转到符号。键入要导航到的类型的第一个字母,无论哪个文件包含它,然后按Enter键。
我们认为没有什么比一个大的上下文切换更糟糕了,当你想要的只是快速检查一些东西。 这就是为什么我们支持偷看的编辑。 当您执行Peek References搜索(通过Shift+F12 )或Peek Definition (通过Alt+F12 )时,我们将结果嵌入到内联中:
您可以在窥视编辑器中的不同引用之间导航,并在那里进行快速编辑。 单击隐藏的编辑器文件名或双击结果列表将在外部编辑器中打开引用。
提示:此外,如果您按下
Escape或在peek编辑器区域中双击,则会关闭查看窗口。您可以使用editor.stablePeek设置禁用此行为。
##错误和警告
警告或错误可以通过已配置的任务,丰富的语言服务或者在后台不断分析代码的连接器(linters)生成。由于我们喜欢无错误的代码,警告和错误会出现在多个地方:
Ctrl+Shift+M以显示“问题”面板,其中包含所有当前错误的列表。
提示:要循环显示当前文件中的错误或警告,可以按
F8或Shift+F8,这将显示详细说明问题的内联区域和可能的代码操作(如果可用):
警告和错误可以提供代码操作(也称为快速修复)以帮助解决问题。 这些将作为灯泡显示在左边距的编辑器中。 单击灯泡将显示“代码操作”选项或执行操作。
这是一款给文件打上书签, 方便快速跳转的插件
| 常用快捷键 | 效果 |
|---|---|
| ctrl+alt+k | 添加或取消标签 |
| ctrl+alt+j | 跳转到上一个标签 |
| ctrl+alt+l | 跳转到下一个标签 |
一个页面是由很多个 Box 组成的,元素的类型和 display 属性决定了这个 Box 的类型。不同类型的 Box,会参与不同的 Formatting Context。
Block level 的 box 会参与形成 BFC,比如 display 值为 block,list-item,table的元素。
Inline level 的 box 会参与形成 IFC,比如 display 值为 inline,inline-table,inline-block 的元素。
它是W3C CSS2.1规范中的一个概念,定义的是页面中的一块渲染区域,并且有一套渲染规则,它决定了其子元素将如何定位,以及和其他元素的关系和相互作用。
常见的Formatting Context 有:Block Formatting Context(BFC | 块级格式化上下文) 和 Inline Formatting Context(IFC |行内格式化上下文)。
CSS3 新增规范,GFC(GridLayout Formatting Contexts)以及 FFC(Flex Formatting Context)。
在行内格式化上下文中,框(boxes)一个接一个地水平排列,起点是包含块的顶部。水平方向上的 margin,border 和 padding在框之间得到保留。框在垂直方向上可以以不同的方式对齐:它们的顶部或底部对齐,或根据其中文字的基线对齐。包含那些框的长方形区域,会形成一行,叫做行框。
inline box是一个(特殊的)行内级盒,其内容参与了它的包含行内格式化上下文inline box超出一个line box的宽度时,它会被分成几个盒,并且这些盒会跨多line box分布。如果一个inline-block无法分割(例如,如果该inline box含有一个单个字符,或者特定语言的单词分隔规则不允许在该inline box里分隔,或如果该inline box受到了一个值为nowrap或者pre的white-space的影响),那么该inline box会从line box溢出inline box被分割后,margin,border和padding在发生分割的地方(或者在任何分割处,如果有多处的话)不会有可视化效果line box里的inline box也可能因为双向(bidirectional)文本处理而被分割成几个盒Line boxes are created as needed to hold inline-level content within an inline formatting context. Line boxes that contain no text, no preserved white space, no inline elements with non-zero margins, padding, or borders, and no other in-flow content (such as images, inline blocks or inline tables), and do not end with a preserved newline must be treated as zero-height line boxes for the purposes of determining the positions of any elements inside of them, and must be treated as not existing for any other purpose.
需要盛放(hold)一个行内格式化上下文中的行内级内容时,创建一个line box。不含文本、保留空白符(preserved white space)、margin,padding或者border非0的行内元素、其它流内内容(例如,图片,inline block或者inline table),并且不以保留换行符(preserved newline)结束的line box必须被当作一个0高度的line box,为了确定它里面所有元素的位置,而其它时候(for any other purpose)必须当它不存在
GFC(GridLayout Formatting Contexts)直译为”网格布局格式化上下文”,当为一个元素设置display值为grid的时候,此元素将会获得一个独立的渲染区域,我们可以通过在网格容器(grid container)上定义网格定义行(grid definition rows)和网格定义列(grid definition columns)属性各在网格项目(grid item)上定义网格行(grid row)和网格列(grid columns)为每一个网格项目(grid item)定义位置和空间。
那么GFC有什么用呢,和table又有什么区别呢?首先同样是一个二维的表格,但GridLayout会有更加丰富的属性来控制行列,控制对齐以及更为精细的渲染语义和控制。
FFC(Flex Formatting Contexts)直译为”自适应格式化上下文”,display值为flex或者inline-flex的元素将会生成自适应容器(flex container).
Flex Box 由伸缩容器和伸缩项目组成。通过设置元素的 display 属性为 flex 或 inline-flex 可以得到一个伸缩容器。设置为 flex 的容器被渲染为一个块级元素,而设置为 inline-flex 的容器则渲染为一个行内元素。
伸缩容器中的每一个子元素都是一个伸缩项目。伸缩项目可以是任意数量的。伸缩容器外和伸缩项目内的一切元素都不受影响。简单地说,Flexbox 定义了伸缩容器内伸缩项目该如何布局。
### 规则1
原文:The left outer edge of a left-floating box may not be to the left of the left edge of its containing block. An analogous rule holds for right-floating elements.
译文:左浮动的盒子的左边界不会超出容器的左边界,右浮动同理.
原文:If the current box is left-floating, and there are any left-floating boxes generated by elements earlier in the source document, then for each such earlier box, either the left outer edge of the current box must be to the right of the right outer edge of the earlier box, or its top must be lower than the bottom of the earlier box. Analogous rules hold for right-floating boxes.
译文:如果盒子是左浮动的,那么在html文档中晚出现的左浮动盒子只允许出现在先出现的左浮动盒子的右边或者晚出现的左浮动盒子的顶部必须在早出现左浮动盒子的底部之下。右浮动同理.
原文:The right outer edge of a left-floating box may not be to the right of the left outer edge of any right-floating box that is next to it. Analogous rules hold for right-floating elements.
译文:左浮动盒子的右外边缘可能不在其旁边的任何右浮动框的左外边缘的右边,右浮动同理.
原文:A floating box’s outer top may not be higher than the top of its containing block. When the float occurs between two collapsing margins, the float is positioned as if it had an otherwise empty anonymous block parent taking part in the flow. The position of such a parent is defined by the rules in the section on margin collapsing.
译文:浮动盒子的顶部不能超出容器的顶部边界
原文:The outer top of a floating box may not be higher than the outer top of any block or floated box generated by an element earlier in the source document.
译文:浮动盒子的顶部不会超出在html文档中早出现的的块级元素(block)或者是浮动元素的顶部
原文:The outer top of an element’s floating box may not be higher than the top of any line-box containing a box generated by an element earlier in the source document.
译文:浮动盒子的顶部不会超出在html文档中早出现的包含盒子的line-box元素顶部
原文:A left-floating box that has another left-floating box to its left may not have its right outer edge to the right of its containing block’s right edge. (Loosely: a left float may not stick out at the right edge, unless it is already as far to the left as possible.) An analogous rule holds for right-floating elements.
译文:一个左浮动元素右边的另一个左浮动元素的右边界不会超出容器的右边界,右浮动同理
如果一行之内要放第二个浮动元素,如果放不下了,那就换行。
原文:A floating box must be placed as high as possible.
译文:一个浮动盒子应该放的尽可能的高
原文:A left-floating box must be put as far to the left as possible, a right-floating box as far to the right as possible. A higher position is preferred over one that is further to the left/right.
译文:一个左浮动元素应该放的尽可能的靠左,右浮动元素应该被放的尽可能的靠右。当元素既可以放置”最高”又可以”最右”的时候,优先考虑”最高”。
为什么盒子五不直接放在盒子一下面,这是因为当一个元素既可以放的最左(最右)和最高的时候,优先选择最高,所以这里就放在了盒子四的下面。
最后说两句,浮动元素其实对在它出现之前的元素影响不大,但是由于浮动是使元素脱离了文档流,那么在浮动元素之后出现的元素:
清除浮动的方法, 主要分为两类
导致这个问题的本质原因可能是Android在排版计算的时候参考了primyfont字体的相关属性(即HHead Ascent、HHead Descent等),而primyfont的查找是看
font-family里哪个字体在fonts.xml里第一个匹配上,而原生Android下中文字体是没有family name的,导致匹配上的始终不是中文字体,所以解决这个问题就要在font-family里显式申明中文,或者通过什么方法保证所有字符都fallback到中文字体。根据这2个思路,目前我找到了2个解决方案:
- 针对Android 7.0+设备:
<html>上设置 lang 属性:<html lang="zh-cmn-Hans">,同时font-family不指定英文,如 font-family: sans-serif 。这个方法是利用了浏览器的字体fallback机制,让英文也使用中文字体来展示,blink早期的内核在fallback机制上存在问题,Android 7.0+才能ok,早期的内核下会导致英文fallback到Noto Sans Myanmar,这个字体非常丑。- 针对MIUI 8.0+设备:设置 font-family: miui 。这个方案就是显式申明中文的方案,MIUI在8.0+上内置了小米兰亭,同时在fonts.xml里给这个字体指定了family name:miui,所以我们可以直接设置。
作者:周祺
链接:https://www.zhihu.com/question/39516424/answer/274374076

在 Android 设备上文字明显偏上的情况一般有两种:


结论: 放大缩小法和添加border有效.

结论: 修改容器高度, 放大缩小法和添加border有效.
…
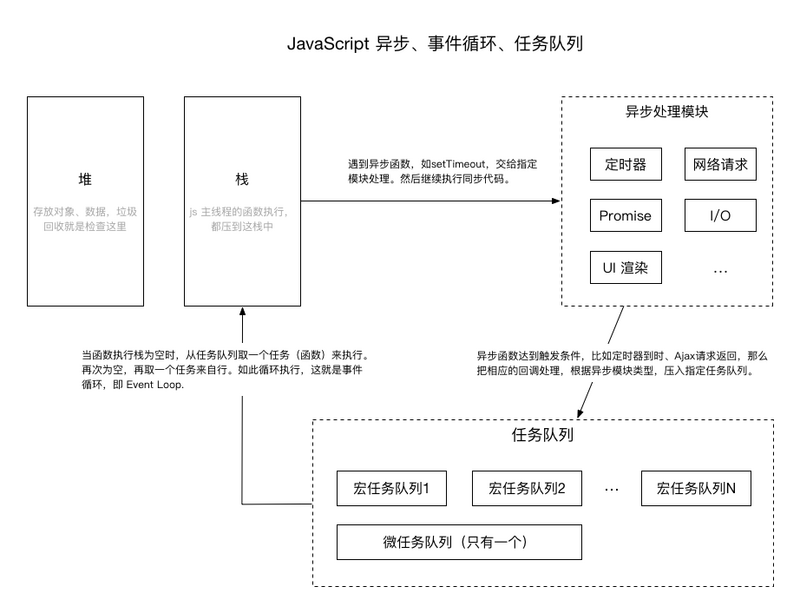
JS中的异步操作:
all/race
状态
三种状态:pending fulfilled rejected
then
…
vue 三要素
答案
…